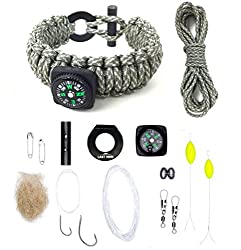
Never heard of paracord projects in 2023? Never tried to make a DIY keychain, a bracelet, a trap, or a leash for your dog out of paracord? Then you simply have to read the article, for, beyond the abovementioned, you will learn how to make or buy various tools such as a survival bracelet or a belt that will raise your chances of survival in any situation.
The paracord, the 550th cord, and the parachute rope occupy a prominent place in the near-war and near-life online communities, among other consumer icons. The main reason to use paracord was to make various self-defense and survival gear items, but now it is used in every sphere. To fully measure the paracord’s role in your equipment kit, you need to understand what it is.
When it comes to survival, we always think of something big like making a shelter, finding a water body to fill in a water bottle, or bringing a first aid kit. But can you name a survival item with multiple uses? One, two, three… I am sure these items have popped into your head: a survival knife, a survival hatchet, survival multi-tool, or duct tape. These are all excellent tools, though, they are not as good as a high-quality survival paracord.
The uses of intact paracord are limited, for sure, but if you separate the strands from each other, then the number of paracord uses simply goes beyond our imagination. Austranats even used 550 cord to repair Hubble Space Telescope!
Well, you may have already guessed correctly: I am going to upend common belief about paracord uses. Learn here how to make rope and use it for your survival needs. I have a lot of confidence that paracord can be used in many different ways. Even you can use rope to make a trip wire alarm. And in this article, we will unleash the veil from 35 paracord uses.
What is Paracord?
Paracord, unlike ordinary braided rope with the same characteristics, is lighter and does not stretch. However, its nylon nature makes it resistant to solar radiation. The paracord consists of an external braid — shell and internal threads — core, each of which consists of several fibers. The prefix “550” appeared due to certification of one of the paracord types to withstand a load of 550 pounds.
Knots You Have to Know
Sure, as with any other survival items, first you have to know how to deal with them and then put this knowledge into deliberate practice. The same goes with paracord, only here you have to master a few “must-know” knots that will play a major role in a survival situation.
Do not worry. There are only 8 knots that any good prepper should be able to tie under any circumstance:
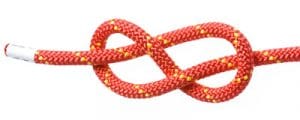
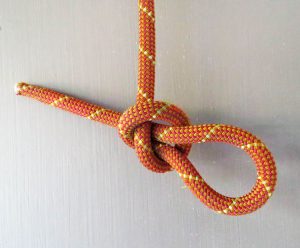
Figure Eight Knots
As the name implies, you have to tie an “eight” in the paracord. Just make a loop over something as a bedrock, wrap the paracord tail under it, and through the first loop. Pull tightly. And here you go: your first “Figure Eight” knot is ready.
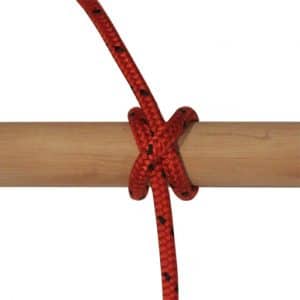
Clove Hitch Knots
You have to tie a paracord around a stick for this knot, then cross the paracord and tie a paracord one more time.
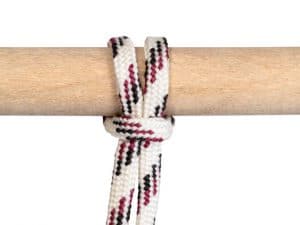
Round Turn Knots
For this knot, you will need a round object you wrap your paracord around twice. Then you cross the cord and repeat the wrapping.
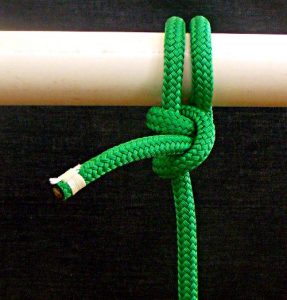
Girth Knots
Put a paracord behind a stick, get it out the stick, and pull through space between the cord and the stick till tight.
Slipknots
Make two loops. The first one is left untouched, while in the other loop, you insert your paracord at least two times.
Constrictor Knots
Wrap the paracord around an object from one side and behind, then put a free paracord end through the crossing.
Timber Hitch Knots
Wrap the rope around the object, pass the working end around the standing part, and pull it to the left from below several times. Pull to secure.
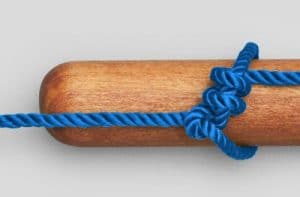
Cobra Knots
This one is the most complicated knot since it is braided. Make a loop and tie an overhand knot. Tie a half knot around the loop and tighten. Keeping the same rope in front, tie another half knot and tighten. Repeat till you reach the desired length.
When you have mastered these knots and are ready for the next portion of wired bundles, this site will teach you more about knot tying.
In our review, you’ll learn about 17 paracord projects that will help you to survive. With the help of paracord, you can create different tools that are useful in extreme situations. Our review has affiliate links that are safe and help you easily use paracord in almost every creative process. Check out this Titan paracord, for instance.
550 Paracord Bullwhip
This is also among the most popular DIY paracord projects. The paracord bullwhip is an excellent example of a skillful combination of modern synthetic material and ancient weaving traditions. Due to the high strength and elasticity, the bullwhip paracord woven from paracord has excellent performance characteristics.
Remember that even the easy paracord bullwhip is not a toy and should be used with caution. We recommend that you wear safety glasses. To make one, you’ll need two paracords, one is 5 feet long, and the other is 15 feet long, and two sections of 50 feet of paracord for every foot of a whip. So you’ll have a 9 feet long whip, but if you want even longer, you can take more feet of paracord. This is one of the easiest DIY paracord projects. So you can make a paracord belt even with your kids.
This is one of the most popular DIY paracord projects. A paracord belt like this one is an indispensable attribute of a real man. He will come to the rescue in a situation that requires urgent solutions: hiking, hunting, construction work, towing a car, applying a tire to a fracture, and even sewing up wounds.
To make a high-quality paracord belt with your own hands, you should follow the instructions at all stages and consider all the nuances. If desired, the paracord belt can be supplemented with inserts (for example, a side release buckle). Speaking about a side release buckle, you should also check the material and the size of it. If you succeed in making a sustainable paracord belt, following the same instructions, you can make a paracord bracelet. These projects are good for beginners.
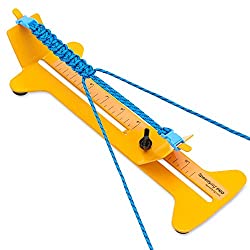
Note: Creating some tools using paracord will take a long time, so we suggest that you make qualifying purchases such as a paracord jig. From the very first application, you will begin to wonder how you did without it before.
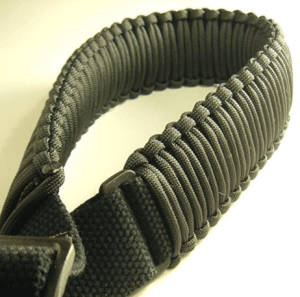
Paracord lanyard is an original type of weaving used to decorate the handles of various weapons — pocket and hunting knives, checkers, sabers, and tools. Although the paracord lanyard is a simple loop of rope and looks like an ordinary modern keychain, it makes it much easier to carry guns and other weapons and work with hand tools. When making a lanyard from a cord or rope, the best option is to make an adjustable loop. But you should not tie the knots on your lanyards very tightly. The Bored Paracord provides a variety of ideas. Have a look at the Ninjas paracords as well.
If necessary, you can quickly turn a woven paracord into the cord’s original state (emergency paracord).
This is one of the paracord projects that is very good for beginners.
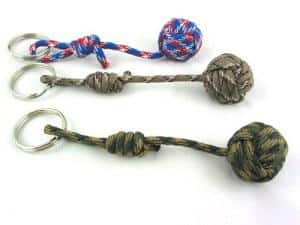
This paracord project is trendy among both survivalists and citizens. The giant paracord monkey fist is a very well-connected knot with a serious history. The monkey fist knot has a long history since the 1800s, and its main purpose is to weigh on the end of a rope or just for decorative use (for example, a paracord key fob). The giant monkey fist was also used as a melee weapon among sailors and gangs.
This paracord project is not for a beginner. The first few attempts can go wrong: this knot needs a lot of patience, so take your time, and especially the final part of the puff, do it slowly, and you will get a cool monkey s fist. And you can make this deadly weapon at home.
This paracord project is a prevalent one. To make a high-quality paracord survival rifle sling with one’s own hands, one should follow the instructions at all stages and consider all the nuances. And the paracord sling will be effective.
If you look at the British soldiers’ pictures during the Vietnam War, you’ll notice that they often used the paracord for making a weapon belt. The reason for it is that the barrel was worn without a belt, but if necessary, you could always make a belt from a piece of paracord, which is always with you.
This DIY paracord project may be a bit monotonous, but the result is worth it. The monotony is that as soon as you start weaving a paracord belt, you will need to repeat the knot over and over again until you reach the end.
This is one of the paracord projects that are very useful for drivers. A paracord grab handle is an unusual survival tool that helps passengers grab something while driving on a rocky road. The Jeep paracord project is good for beginners. To complete the entire process, you will need a 550-paracord with a total length of at least 18 feet.
If we compare a store-bought grab handler made of cloth and one made out of paracord, we’ll notice that the last one is cheaper. Also, because of its rescue weave, it can unfold easily and be used as a part of a first aid kit, or then you can use the cord as a paracord backpack strap wrap. So, we can name it a multi-tool. It also weights not so much, so you can easily keep it in your bug out vehicle.
Many people use an Altoids tin for keeping in it a list of some small stuff, for example, matches or a lighter. It is a good DIY project for survivalists. But the con of the tin is that it can make sounds while you are walking. There can be a certain survival situation when silence can save your life. That’s why this easy to make DIY paracord is necessary to have on your bug out bag list.
Such a paracord pouch is not difficult to make. If you can handle it and understand how to make paracord button knots, you can create something more difficult, for example, a paracord wallet. Of course, for making this paracord thing, you should learn about different paracord knots. After handling it, you can start to learn to make more difficult things using paracords, such as paracord rock sling or paracord watchband. You can choose any project that you like.
The idea to make a paracord project of building a paracord drawstring bag, for instance, is for people who already have some experience of working with paracord. Surely you have often met paracord woven bags, which are very convenient to carry or store fruits and vegetables, towels and blankets, as well as many other items. This project’s popularity is easily explained: such bags are inexpensive, practical, strong, and durable.
This paracord project offers to make a handy survival tool. Snowshoes are a tool designed for moving in the winter. Providing fast movement on snow, as well as in general the ability to move on it, due to snowshoes, is what can save lives in survival conditions. At the same time, do not complain that you do not have this thing with you. You would have the materials, time, sufficient survival skills, and knowledge to make snowshoes from improvised means! But you should learn before it how to make different paracord knots.
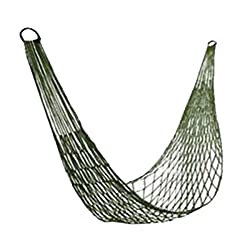
This is one of the most popular DIY paracord projects. A paracord hammock is a good survival item that is not expensive to make and weighs little. There are not very many step instructions, and even they are easy to follow. You can implement all your ideas when creating a paracord hammock because there are different paracord knots. It is presented in different colors and different types, for example, 11 paracord. Use it in minimalist camping: it fits anywhere.
Paracord Bow Sling
This project is similar to the project concerning a paracord bullwhip. If you are a hunter, this is one of the projects that is definitely for you. It’s hard to handle bow constantly, so but store-purchased bow slings are pretty expensive. This paracord bow sling will serve you for a long time because of certain characteristics of paracord.
Paracord Snare Trap Rig
This is a good project about how to make a paracord snare trap. You should never be overcome by fear and panic when you run out of food in the woods; instead, you should make good use of the paracord and build traps. Universal paracord cordage can be used to build traps for both small and large enough game. It’s one of the most useful DIY paracord project ideas.
This is a popular project because the paracord snare trap is not very expensive and energy-intensive to make. Even your kids can join the process of fulfilling this DIY paracord project. To make it, you can use paracords of different colors and make different knots. This paracord project is significant for survivalists because this skill can save their life in some extreme situations.
Paracord Bottle Harness
This project offers you to make this extremely necessary in the economy case-string bag for plastic and glass water bottles. It takes three meters of gray and orange paracord to make a bag cover. The choice of orange color is since it makes it easier to find a bottle in such a case in conditions of insufficient visibility or, for example, in high grass.
Basically, such a paracord bottle holder is designed to increase the convenience of carrying plastic or glass bottles. But nothing prevents you from using it for other purposes, and it makes a paracord water bottle harness a multi-tool. For example, when using a plastic water bottle as a washbasin. Or whether to use the case as a regular bag-string bag for transporting any items. This is one of the easiest to fulfill projects that has simple instructions.
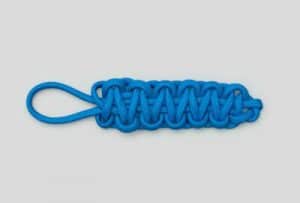
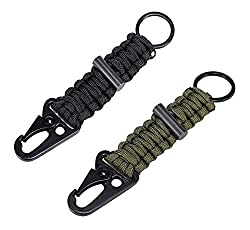
Paracord keychain is useful for all lovers of outdoor activities. It will help you keep a lot of small useful things at hand. It will also be useful for you in survival scenarios.
Often (and almost always) lovers of paracord weaving have a lot of scraps left. Some people throw them away but don’t do it. This is one of the projects that doesn’t request lots of feet of paracord. From just a small amount of it, you can make your own paracord key fob. This DIY accessory is perfect for fans of extreme recreation. It is performed with the “cobra” knot. But you can go further with your ideas and use other types of knots.
There are different colors of paracords so you can choose any of them. You can make one in just an hour. This DIY paracord project is perfect for those who only get started at the weaving paracord things.
Such types of projects are exactly for those who love extreme recreation. For them, our information about a survival paracord bracelet will be useful for acquaintance. Paracord bracelets do not resemble women’s jewelry. But you don’t have to be an extreme person to wear this paracord bracelet. If the paracord bracelet is made of cords of bright colors, you can also use ethnic style. As a rule, the cord for a survival paracord bracelet for anglers has either camouflage or olive color. The project about survival bracelets is the most popular.
When making a survival paracord bracelet for anglers, you can use the method of weaving as fast-spreading survival bracelets. But you can use other ways of weaving bracelets from paracord and use the bracelets for fishing. After fulfilling this task, you can go further and make a paracord watchband. It is similar to a survival bracelet as the same knots are used. You can also list your ideas and try to do something extremely new. A survival bracelet is just a start.
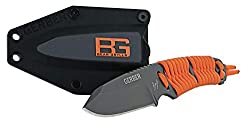
Not all knives have a wooden plastic handle. Sometimes the design involves leaving a bare shank, which can slip out of hand or cool it. This project concerns methods of how to make a paracord knife grip.
To wrap the handle of a knife with a paracord, you do not need any special knowledge and tools, and the materials will be affordable for everyone. This is one of the most suitable paracord projects for beginners and beneficial survival gear. You can improve your knife blade with a 550 paracord.
Such types of projects that concern cold weapons that’s why you should be careful. But here you can implement all your ideas.
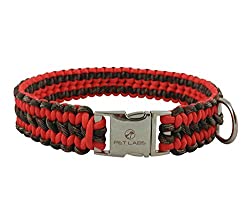
DIY paracord dog collar is trendy nowadays. This is due to the opportunity to get inexpensive but a very stylish paracord accessory. The choice of models and types of dog collars today is almost unlimited.
You need to remember that all buckles and rings must be soldered or cast. It is enough for dogs of small breeds to purchase plastic accessories or fasteners made of thin steel. Using paracord, you can also make an easy paracord dog leash. Paracord dog leash and paracord dog collar are the things that can match together perfectly. Your dog will look very stylish, and you won’t need to give much money for this. The paracord’s strength and resistance to rot make paracord dog collar and paracord dog leash ideal for their purpose.
Paracord Survival Donut
As the Reality Survival site proves, using paracord, you can do different DIY tools for self-defense or survival. But it’s challenging to pack a large amount of paracord in a bug out bag (there are also bug out bags for kids). That’s why this is one of the most useful paracord projects. You don’t need much time to make a cool paracord survival donut with a quick deploy function, so this way of paracord weaving is necessary for a survival situation.
Those 17 Cool Paracord Projects Should Keep You Busy
As you can see, there are many ways to use paracord cords, but you can only learn how to use it properly if you practice enough and you’ll get many useful tools. For example, an iPhone cable, for making accessories for a cell phone, a hanging chair, a fishing net, a paracord laptop harness, a paracord pet harness, a sleeping bag, a paracord rock sling, a watchband, a phone cable, a drawstring bag, a paracord wallet, a paracord keychain, a paracord pouch, ranger beads or maybe some means for self-defense. All in all, the list of paracord tools consists of many items. Due to the different colors of paracords and weaving, you can make anything that you want.
In this article, we’ve tried to cover some of the most critical paracord application areas, but you can always get creative. As for the usage discussed, the paracord can be an innovative and versatile tool for survivalists.
Emergency Paracord Uses
To begin with, we will cover paracord emergency uses since these are vital skills for wilderness survival.
1 – Sutures
There are no guarantees that you will get out of the woods unwounded. Anything can cause a mild or severe trauma, be it simple tripping over a dead branch or an animal attack. Even mild injuries when they are untreated can be fatal, especially if an infection had set in…
Not always you have a professional medical careworker nearby to help you with the injury, especially in a survival situation. Quite often, the wounds require some stitching to avoid serious infections and massive blood loss.
With a reliable suture kit at hand, this task is easy. But what if you did not pack it or lost it on the way? Then a paracord may come in handy, in particular its inner threads. Remember, these sutures are only for emergency use and have to be treated immediately when you reach professional medical care.
Here is the paracord suture guide:
The inner strands of paracord are the best option to stitch a wound when you don’t have a medical glue tube, in an emergency since they are both strong enough and thick enough.
First, you have to “peel” the outer strands of the paracord so that then you can pull the exposed inner strands out. Try to get a strand as long as possible. Then find yourself a good needle, and you are ready to get the wound closed.
You will start stitching in the middle of the wound. Better if you have a good set of hemostats in your survival medical kit, this way, you will be able to stop the blood flow and see where you have to stitch. Make sure you hold the threaded needle up to maintain sterilization. Push the needle into the skin about half a centimeter from the wound opening.
Every time you push the needle through the skin around the wound, make sure you adjust the hemostats. When you finish each stitch, wrap the thread twice around the hemostat head and pull the thread’s tail through itself to make a knot. The skin edges should not overlap when you pull a thread. Repeat as many times as your wound size requires.
Here’s a short video explanation for the process:
2 – Splint
Quite often, some other traumas, such as muscle, bone, or joint injuries, will await you on the wilderness trip. Not only are such injuries extremely painful, but they might also affect your mobility and, in the worst-case scenario, even leave you fully or partly immobilized or disabled for life.
Such injuries can add some restrains to your rescue mission. Depending on your situation, you might freeze in the cold, get overheated, or lose more fluids than you can take in.
In this case, paracord can come to the rescue and serve as a splint to support a damaged limb and alleviate the pain. And it might enough for you to get through the harsh times and eventually find your way home to safety.
Here’s a short guide of how to make a splint out of a simple cord:
Cushion the injured limb with something soft like a jacket or shirt.
Stabilize the injured limb with a stick or something hard.
Wrap the cord around cushioning and stabilizing material.
Tie a knot that will not stop blood flow but will also hold the splint.
Chose the knot position appropriate to your injury: joint injuries require the knots above and below the injured joint, while for bone injuries, you have to tie knots on the above and below joints.
If you need extra strength, braid the cord or wrap it several times around a makeshift splint.
3- Sling
A sling is useful for both controlling injured upper limb movements and being a splint in case no real splint is applicable. With a sling, there will be less damage to the injury as well as alleviate the pain.
To make a sling is basically the same as for a splint. You will need a cushioning and hard stabilizing material that you wrap the cord around. For an arm or elbow sling, you will have to tie a slipknot around the wrist, crane it behind the neck and tie it to the elbow with a slipknot. You will also need improvized “cushions” for your neck and elbow to avoid side effects such as irritation and rubbing.
Again, if you need an extra-strength cord, then you can braid it or use several wraps.
In this video, splinting is done with cravats, which is basically the same for paracord:
Cravats are better than paracord, but for survival uses, a paracord might do just as well.
4 – Makeshift Paracord Stretcher
A paracord stretcher is a must-have survival tool when walking is hard due to illness or severely broken limbs.
Never leave a person in need unattended even if you know that help is just right around the corner of the mountain, and it is faster for you to get there and bring the rescue team to the place where you are right now. Why? You might get stuck or injured, while the person might get dehydrated, frozen, or overheated… or an animal might suddenly drop in.
But with a makeshift paracord stretcher, it is possible to move as a group, more slowly but together and moving.
To get a makeshift stretcher, you need ten lengths of paracord. This s-shaped paracord pile is the part for the injured person to lay on. Use an extra piece of cord to make loops using a clove hitch knot on each length and pull the rest of the paracord through these loops. The end must be tied to the stretcher’s body. You can also put poles or human-length sticks through the loops instead of paracord to add stability. Here’s a website that shows the process.
And if you do not have the poles, here’s what the whole assembly will look like:
5 – Tourniquet
Open injuries are always followed by bleeding, either extreme as arterial bleeding that is hard to stop or mild one, but that still can lead to comatose-like conditions. In such cases, a rapid application tourniquet will help, but paracord can do the job just all right.
The only rule for such situations is acting as fast as possible to prevent losing so much blood that consciousness leaves you. If you have a paracord bracelet on your wrist, you already win in speed.
For a paracord tourniquet, you need to braid a 1-1/2 inch wide paracord to avoid lacerations. Do it as quickly as you can. Then wrap the brained paracord above the wound and tie a knot where you put a stick. By turning the stick, you can tighten the tourniquet making the blood flow stop. Untie the stick, so you do not have to hold it permanently with your own hands.
6 – Rescue Line
Thick and long paracord bracelets are a great way of saving time, especially in cases where you do not have a plethora of it, like drowning or quicksand.
To save the victim from trouble, first ensure that you are far enough away from danger. Here works the rule of first providing the oxygen mask to yourself and only then to the baby. Make sure that you stay steady on your two feet. Then tie a figure-eight knot and toss the line directly to the victim or a floating object better upstream so the person can surely grab on the paracord.
Survival usually means fighting for yourself and your family. Self-defense is one of the main priorities for any survivalist. Here we provide you with self-defense uses for paracord.
7 – Tripwire Paracord
In the wilderness, animals pose a special threat to your safety. And it is better to be prepared and install some traps at a shin level at a place of most likely intrusion. A tripwire made out of inner strands of paracord may help to disorient an intruder and give you time to hideaway. Just tie the strands between two trees or spikes in the ground. And now you can sleep safely.
8 – Perimeter Tripwire Alarm
Another version of the tripwire discussed above is to locate it at the perimeter of your shelter. I recommend using this option at night or in severe weather since your vulnerability increases at such times.
There might come a time when you need to restrain someone by tieing them up to a tree, chair, or any other heave object. During TEOTWAWKI times, anything can happen – everyone is fighting for their lives.
It is best to always have the already braided cord about 1,5 inches thick. You have to make two same sized loops and tread each loop into each other. Insert the intruder’s limbs and tighten.
10 – Firearm Cleaning
Gun barrels can get dirty, especially when exposed to weather elements. That, in turn, affects the accuracy of your shooting by changing a bullet’s trajectory. When your survival depends on your firearm, it is of vital importance to have it work as well as it can. Usually, people use a bore snake for cleaning the firearm.
However, in a survival situation, you can clean the barrel by putting in the paracord with tied knots 1-3 inches apart alongside one-third of the paracord. The knots will get all the dirt away. Remember that you have to apply pressure. If the knots are too easily squeeze into the barrel, you have to retie them and make them bigger.
11 – Sling
No one can ever accurately predict how long they are going to stay in the wild. Everything here depends on your mobility, health, a sense of direction, and natural factors out of your control, such as weather.
And even if you are left with nothing but a survival bracelet, you have quite high chances of getting out of trouble by making an improvised stone-throwing sling. With a sling, you can both defend yourself and your family and catch food.
You do not need much equipment for a sling: just a few 2,5 feet long strips of paracord, some fabric, and a few stones in case your precision is not that good.
The fabric or something similar has to be soaked with a stone inside and let dry for creating a stone pouch. Do not forget to make holes in the fabric for tieing the paracord. On one end of the paracord, tie a bowline knot with a small loop so that your thumb can fit in. This will be the part where you hold the sling. Tie the other end of the paracord to the fabric with three overhand knots. And now, you can begin practicing your precision and accuracy with a makeshift sling!
Here’s a brief video guide on the making of a survival sling:
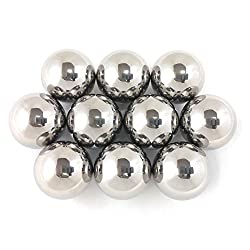
12 – Monkey Fist Tool
A monkey fist is another simple self-defense tool that you can use paracord to create with. Especially in times of TEOTWAWKI, you will need something to keep your shelter, food supplies, and family safe and sound. A great advantage is that the monkey fist can be used from a distance allowing you to stay away from danger and not being held by another person.
The monkey fist knot has been known and applied in fights since the early 1800s. The evidence shows that with mastering this knot, nothing is a threat.
To make a monkey fist using a paracord, the requirements are simple: a good and lengthy 550 cord, something round to wrap the paracord around, scissors, or a sharp knife.
For defending purposes, choose a big or steel ball and paracord of 4-5 feet long. Loosely wrap the paracord around your spread out fingers and repeat the same four times. Then change directions and repeat four times. Now you have an X with a space inside where you have to slide a stone. Now do the same procedure four times more. The covering should be done with a slow tightening of the cord with four wraps from all angles. Your cord has to be as tight as possible. When there is no room for any applied pressure from your side, stop wrapping and attach the monkey fist to any object.
And as with slings and knots, just keep practicing until you are the master of the trade.
Here’s a video on how to make a monkey fist with a huge ball.
Hunter & Gatherer Paracord Uses
Not only can a paracord help save your life in the sense of self-defense, but also paracord can be used for obtaining and storing food. And as we know it, food is more than just a word – it is essential for keeping you alive under any circumstances, not to mention survival.
13 – Fishing Net
A very old way of getting as many fish as possible is to use a fishing net. And with a paracord at hand, you are destined to provide yourself with enough OMEGA-3.
Cut paracord according to the desired net size and get the inner threads. Attach the sheath that will go horizontally and inner threads that will go vertically to the corners. Inner strands with 2 inches spacing have to be tied to the sheath. When you go in the opposite direction, tie a knot each time strands overlap.
14 – Fishing Line
Sometimes the length of the paracord you have is not enough to make a net, but just enough for a fishing line. Get the inner strands and tie their ends together with a bend knot. Tie the makeshift fishline to the stick, get a hook out of a soda can you might have in your bug out bag, get a load of patience, and… wait for your good luck.
Yeah, we all know that fishing requires a ton of patience and a double ton of time, which is of the essence for many survivalists. A single fishing line is not enough to provide you a meal that will stuff you up, but a trotline can do the trick. Repeat the same procedure as for the fishing line but add some additional trots with hooks, and you are ready to adjust the line over two points in a water body.
16 – Fish Stringer
If you are in luck, you can even find the place where fish nest. In this case, you can easily stock up for later. To bring this stuff back to your campsite, you will need a fish stringer. You can use the outer paracord sheath. Just tie one end to a rock, make a slipknot through fish gills and slide it to the rock. Repeat for as many fish as you have.
17 – Bear bag
In the wilderness, you are both a predator and prey. And your hard-earned food is at risk as well. You sure do not want to miss it or give to the mercy of any other wild animal.
With a survival paracord, you can hang your game up and minimize worries of it being picked up by any animal or human thieves.
To make a bear bag, you will have to find a robust branch and a paracord twice as long as the branch. Throw the paracord over the branch, tie your food, and pull it up while tieing the other end of the paracord to the tree trunk or another branch. In this case, it might be wise to braid your paracord for strength.
With a bear bag, you can be sure that no one or nothing is going to steal your food away unless they are good at jumping or climbing trees.
18 – Paracord Animal Trap
Some survivalists also install many animal snares to increase their chances of getting enough food with almost no energy spent. At best, set snares in the late afternoon near water holes or feeding areas, where there are high odds that animals will pass by. Do not worry if you do not catch anything on the first day. Let your trace smell vanish away first.
Make a loop out of paracord with a slipknot, attach it to the hook, which goes to the leader line attached to a tree or stick for tension. Place the bait in the middle of a loop, which is the size of an animal’s neck you wish to catch.
Traveling Paracord Uses
I truly believe that traveling is no different from survival in many ways. And sometimes, moving from one place to another during survival might save your life depending on the situation. So, I would recommend getting yourself acquainted with these traveling paracord uses.
19 – Paracord Snowshoes
Weather is something we cannot control and sometimes even predict for longer than 24 hours (and even that is quite an arguable number!).
Just imagine that you went on a hike in the mountains with no proper footwear, and each step gets harder and harder… Post-holing slows you down and eats away your energy and precious time. But no worries, snowshoes come to the rescue!
There are a few steps to create snowshoes out of parachute cord:
You will need four branches that are a bit longer than your foot and ten branches wider than your foot.
Make an outer framework out of 4 long branches enframing your foot.
Fill in the top, the bottom, and the center parts with five small branches and intersect them with the other five branches.
Tie the branches with constrictor knots.
Make the shoe foundation with paracord.
Make loops on the top to hold your foot or weave the paracord and shoe foundation to your foot.
Now you are more than just ready for a deep snow walking.
20 – Bug-out bag always on you
The End Of The World As We Know It might happen or not, but you have to make sure your bug-out bag is tied to you tightly so no one can take it away from you. When there is a need to survive, essential survival tools are at risk to steal with no ethical requirements.
The whole idea is easy – use basic knots to tie the pack to yourself. No matter what size your bug-out bag is, with a simple knot, you can minimize the probability of theft.
Although you may have the best sense of direction in the whole world, you may still get lost while leaving the campsite, even for just a short time. You should also factor in some unpredictable weather changes that may have an impact on your orientation.
Here’s a useful trick that can help you trace your steps back. Short threads of paracord tied at eye-level to branches will show you how back to the campsite or the location you have been before. These threads can later be used as zipper pulls or tinder for fire starting.
22 – Crossing a river
On your many journeys, there will be times when you need to cross a stream as fast and as safely as possible. With nature, odds are never on your side, but with a paracord, you may reach the other side of the water body with little to no worries.
The first method works best in pairs since, in this case, only one person is put at risk while the other is there to help. Tie one end of the paracord with a bowline knot to the first person to cross the stream and tie the other end to the tree. When the person is on their feet on the other side, they should tie the cordage on another tree while you wrap the paracord around yourself.
If the length of the paracord does not allow you to do the crossing one by one, then you should tie the paracord to each other and move slowly together. This method is pretty risky. If one falls, the other might not be able to catch the person, and they can then get swept away.
When crossing the river single-handed, nothing changes except that you have to leave the cord behind. Some streams are way too dangerous to cross without any tool, so it would be a cost well-paid.
23 – Rafting
Well, lucky you, if you just encountered a stream or a river that is narrow enough to cross with a paracord, but what if you have reached a lake or a stream turned into a massive river overnight due to heavy rains? Then using paracord to create a raft may be the best option on the plate.
Look around and find five big wooden logs and four thick long branches to secure the logs together. Place the branches over the logs and use some survival knots to wrap the intersections with a paracord either several times or with a braided cord to add extra strength.
24 – Towing
Let’s imagine: you are out on a motorbike with a beautiful side-carriage packed with everything you need for a picnic when the motorbike suddenly breaks down. Since it is unwise to leave everything behind and you surely need this equipment, the paracord can be used to tow the motorbike to the destination point or the nearest pit stop if there are any on the way. Make sure you braid the paracord and use several knots to affix and strengthen the paracord. A timber hitch is a perfect knot to properly secure the object that needs to be hauled.
25 – Free Hands
Sometimes there is a strong need to carry some extra stuff – you have collected more food than you were hoping for, or you want to help out your friend with a broken arm… Paracord can help carry even more than was originally designed with the smart use of knots and braids. Do not forget to affix the paracord; otherwise, you might end up being in a situation when you cannot make a single step without something falling down.
Everyday Survival Paracord Uses
These uses for paracord might not pop into your head right away, for example, survival bracelets, but make sure you know them, so you are prepared for any situation to come.
26 – Shelter Tent Support
Any shelter can be made up of a lightweight tarp and a paracord threaded through the tarp’s eyelets. You can either secure paracord between two trees and put a tarp over it, or you can tie the tarp to get yourself a sleeping hammock.
If you are afraid such construction is going to fail you, just braid the paracord and use two or more lines.
27 – Bow Drill
With the absence of any fire starter kit, an old and rusty bow drilling fire-starting method comes in handy to get the sacred fire to keep you warm and your food ready.
Cut notches in the branch; you are going to use a bow to secure the paracord tied with slip knots. For successful bow-drill performance, you need to secure the paracord as tightly as you can.
28 – Mending Torn Clothes
I can easily imagine a prepper to trip off a tree branch and tearing their wool pants down. It is not a disaster, you might say. Yeah, but what if the pants are waterproof, and it has been raining the whole time, and no clearance seems to come up any time soon. Here, you may sew the hole with a few paracord stitches from inner strands and enjoy the dryness again.
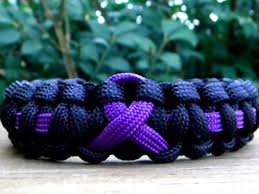
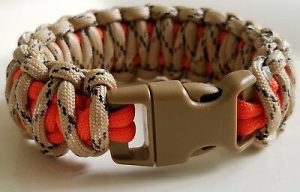
29 – Belt or Survival Bracelet
In some emergency situations, you might need an emergency belt or a survival bracelet. For this purpose, a cobra knot is extremely useful. Do not forget about the buckle first, though.
I would put these survival bracelets at the five top survival paracord projects. Paracord bracelet is also a survival item that is always on you and can be used as a real, though short, rope in an emergency.
30 – Make A Strong Rope
The rule of thumb for a convenient trip is to make your bag as light as possible. Rope weights quite a lot, while paracord beats it by being lightweight, strong, and less voluminous.
In case you might need a heavy and highly robust rope, just braid a few paracord strands together with cobra stitch or other similar knots. And your climbing rope is ready.
31 – Rope Ladder
Not everyone is born tall. And sometimes, even the tallest of us need some elevation. With an improvised paracord rope ladder, the problem does not exist anymore.
To make the ladder, you will need two long pieces of paracord and a few robust branches capable of holding up your weight when you are going to step on these makeshift rungs. Paracord pieces should lay parallel to each other and overlap the rungs for about 2 inches on both sides. To tie the paracord to the rungs, I recommend using constrictor knots since they are strong enough to endure the pressure and for tieing the top of the ladder, a bowline knot.
32 – Pet Collar / Leash
With a paracord, pet owners might relax if they found out that their pet’s collar or a dog leash had been forgotten or lost somewhere on the way to the destination point.
Be careful when choosing the paracord type to use as a dog leash or collar. It is way safer to use a braided paracord than a single-stranded not to accidentally choke the pet.
33 – Shoelaces
I am more than just sure that at least one time in your life, you had a broken shoelace. Maybe it was near your house so you could go home and change the boot laces. But let’s imagine it is a week-long hiking trip. If you cannot fix it right, the chances of tripping over and an eventual trauma rise significantly.
But lucky you are if you have a paracord at hand! You just have to measure the shoelace length of paracord, melt its end to avoid fraying, and replace the broken shoelace.
I advise you to get paracord fire laces that go with fire starters. This way, you would not have to worry about losing your shoes or your head on your hiking trip.
34 – Hang Tools From Belt
When there is a clear need to survive, quite often, you must have a lot of tools at a hand’s reach. And here, a tool belt comes in as an amazing option to set your hands free and provide you more safety and comfort.
Even for mundane things like food gathering or something more serious as fighting for your life, a paracord belt will help to have all the necessary tools ready.
To get a paracord belt, you need to get a few pieces of paracord about 15 cm in diameter, wrap them around the belt and tie them with a simple but strong knot.
35 – Paracord Dental Floss
This way of using paracord might not be an obvious one as well as the most essential but knowing it may come in handy. I bet all of you have experienced this uneasy feeling of some food stuck between your teeth and there is no dental kit around. And the feeling becomes more and more irritating if you cannot free this piece. No worries, in such situations, you can use inner strands of paracord to experience the relief of getting rid of this nasty piece of food. And it is also a good way of caring about your dental health in the wilderness. Because, well, you know dentists are hard to come by in the woods.
Bottom Line
It does not matter how many videos or articles you read on survival. It is of vital importance that you put every bit of absorbed information into practice, especially if we are talking about paracord uses. Just get yourself a few feet of paracord and start toying around with knots.
FAQ
How to braid something from a paracord?
Several techniques can be used to braid paracord products. They all differ in style and level of difficulty. Beginners are recommended to start with the most straightforward schemes. It is better to practice first on them and only then proceed to more complex ones.
How to make a lanyard from paracord?
To make a paracord lanyard with your own hands, you are to is follow the classic schemes and instructions of macrame. The macrame technique is based on the weaving of knots, in our case ‒ dissolving. If the paracord product does not dissolve, then it can be considered damaged.
After fixing, divide the paracords into two halves. Separate the two cords in the middle and one on each side for each half.
In order, trace the side cords around the base of each part. After each node, alternate the side cord of one half with the side one of the other halves. Thus, X-like bonds are formed between two parallel plexuses.
The edge of each lace is brought from the bottom up through the slings and from the top down in the other direction until the end of braiding.
What cool things to do with paracord?
There are many cool things that you can do with a paracord. For example, accessories for a cell phone, a hanging chair, a fishing net, a laptop or pet harness, a sleeping bag, a watchband, a drawstring bag, a wallet, a keychain, a pouch, ranger beads. All in all, the list of paracord tools consists of many items.
How to make a hammock out of 550 cord?
Step 1: Start. First, you need to hang six paracords at a distance of about 4 feet from the ground.
Step 2: Then tie five strands onto the top strand about five f. apart. Side strands should be longer than five ft.
Step 3: Tying. Take the 2nd and 3rd strands and tie a knot on top. Then take the second thread, which should be on the other side of the third thread, and tie it to the fourth thread. Continue until you reach the desired width.
Step 4: Side strands. Now you need to tie the side threads to each of the node areas.
Step 5: Ends. Now you need wood waste about 1 1/2 inches thick and 2 inches longer than your wide hammock. Now drill holes for each thread. Insert the strands into the holes, tie them all together, and make a loop. Now place the carabiner in the loop. You can tie small strands of paracord project around the tree and attach carabiners to it.
How to make a paracord ring?
Fold the material in half and push it into the recess of the plastic carabiner. In the loop formed in the process, stretch the ends of the lace, and tie a knot.
Attach the second half of the fastener to the ends and determine the required length. If the free slings are very long, then cut off all the excess. Otherwise, the loops will be too wide.
Start braiding. For this, you need to circle each of the tips through 2 fixed middle slings. Moreover, one of the elements starts from the bottom up, and the other, on the contrary, from the top down.
Continue braiding paracord in this technique until the end. When finished, pass the ends through the mount. All excess is cut off with scissors and melt with a lighter.