Introduction
One cannot survive a day or two without the very basics in 2023: survival food, water supplies, a reliable, sustainable shelter, and weapons to defend oneself, of course. One’s well-developed survival skills and adjustability to different situations are of paramount importance. However, when it comes to real danger and long-term survival, reliable survival gear is what will save your life in the end of the day. When one is well-prepared, any danger becomes more bearable. Therefore, preppers, campers, survivalists, and homesteaders are on the rise these days when the level of uncertainty is high and the future is dim and shady. Read the article to expand your survival knowledge. Who knows, maybe this will save your life one day!
To the point
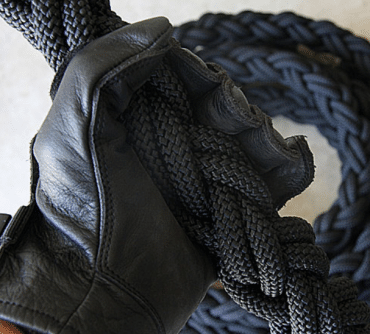
Everyone needs a rope during survival adventures, even in the case of SHTF. To tell you the truth, it is helpful in many situations: hunting, making shelter, fighting, carrying things, even for climbing dates. I guess each survivalist has some kind of rope in their bug-out backpack.
Many years ago, ancient people were braiding, pulling, lifting, and crafting ropes of different forms and lengths from various materials. Later, a special machine was invented to perform the crafting technology: it firmly tied the strips together, producing ropes of the same form, twisted in the same way. Such a machine consisted of a hook and a mechanism that would spin the threads automatically. Do not use extension cord as a rope in any case.
There are several types of rope: braided rope, rope with natural fibers and plant fibers, twisted rope, twine rope, hemp rope, nylon rope, jute rope, and that is only the beginning! Most of them you can use to create a trip wire. All of these types of rope can be found in the shop, yet we aim to learn how to make rope and craft it by ourselves. In this article, we will discuss how to make a rope.
Why do You Need a Rope for Climbing?

Initially, rope climbing was a regular exercise in the army, in the military services. The manila rope was used in such practices. Manila ropes are relatively easy to climb, though they tend to become slippery and can leave bits in your hands and other parts of your body if you’re not careful when climbing or sliding down the rope.
Moreover, the ropes for climbing in the military services are usually purchased in the shops. They are not handmade. Thus, they are created to be very tight and solid.
It is almost impossible to create such a rope by yourself, but we will try to do it and craft the rope together.
Material Choice for Crafting
As already mentioned, you are capable of making rope from any material you desire, and there are many options available:
- Buy synthetic strands from the shop: use nylon, manila, jute, polypropylene rope;
- Buy natural fibers: grass, hemp, flax, twine, bark;
- Utilize some extra materials: plastic bags or paper, shredded into strings.
So, just make sure to choose the needed craft and create your rope!
Rope Making Process: Step by Step Guide
Let us now discuss in detail the rope-making process.
Step 1
Get the threads. Your yarn (thread) can be anything: a string of paper, a strip of bark, some piece of string. Your threads should be of the same thickness and length and the same material, of course.
In case you want to have a thicker rope, you should get at least six threads. You should acknowledge that the entire length of your rope would be smaller than the initial one, as when you twist the rope, it gets shorter.
If you started the rope-making process and the length is not long enough, it is not a problem with plant fibers. With elements such as grass and natural fibers, one may quickly splice more threads later to make the rope of a suitable length.
Step 2
You should tie your strings (threads) concurrently. You should put your threads in such a way that they are lined up. Then, make a knot at one side of the threads to fix them. The other end should be free. You must divide it in half. When it is done, there will be a V-shaped bundle (with a knot in the upper part).
Step 3
Twist the halves of the threads. You should take each section and start to tightly twist the threads into the same direction. A thoroughly twisted rope is a guarantee of your safety!
You can twist the strands either in a counterclockwise method. Just remember to put the strands in one direction. As you twist, the two strands will cover one another, making the braided rope.
Step 4
Then, combine some extra threads to make a rope of a longer size. If the entire rope is made from plant-based materials, it will be really easy to do so. Once you come close to the end of your 1st bundle, you should take two more parts of that one yarn that are the same in terms of thickness.
Apply the tails of the original string sections to the ‘heads’ of the new ones. You should put the tops of the heads just below the tails. That way, the new threads are fixed in one place. Now, just continue twisting. Continue twisting: during the process, the new and old sections will be wrapped together, providing one with an extra length of rope.
Step 5
The next step is to tie your rope off. Once you are done with your twisted rope, you should put the threads together and tie another knot in the end to prevent the unraveling of the rope.
If you work with synthetic materials, you can burn the end, so the material will melt and tie everything together. Make sure to follow the safety techniques while burning the ends of the rope, as the synthetic rope tends to be easily flammable.
Step 6
Cut off extra yarn that you do not need. Trim the excess. Once again, if you have a plant-based yarn, you should cut off any extra threads sticking out of the rope.
If you want your rope to be even more firm, you should repeat the process and twist the two new-made ropes together.
How to Make Rope With a Reverse Wrap
A reverse wrap is another methodology of making rope. It is as fast and as easy as the previous strategy.
Step 1
Of course, the first step is to choose the materials and get the yarns. In a reverse wrap method, you should twist the rope in a basic twist process.
Step 2
You should make a knot and put the treads into two parts, make sure to line them up evenly. Then, they should be tied into one united bundle that is connected with a knot. Nothing different from the previous methodology!
Step 3
Your main goal is to twists and whip together with the two yarns of the strand (either grass-based or synthetic thread, it does not matter). Now, you will have to get the top of the threads (the ones placed nearby the knot) in your non-dominant hand. Your dominant hand should grab the part that is farthest away from you.
Twist the part of the yarn away from you once. Afterward, you must transfer it over the other section back to yourself, grabbing it with your non-dominant hand and tightening it in place (just like you were braiding only two parts).
Then, take the new part in the dominant hand and repeat the process.
Step 4
Frequently Asked Questions (FAQ)
How To Make Rope From Grass?
As you already know, it is pretty possible to make a plaited rope from grass. The material is very flexible, yet you should remember that your grass should not be fragile (to dry), as it is very prone to breaking. This will surely lower the quality of your rope!
So, grab your grass or any other natural fibers (e.g., cotton). You should put the wires of the strand into two parts and begin crafting. Before doing so, you should tie the knot at one end of the threads to secure the cordage in one position. Form a V-shaped structure, and begin twisting one strand up another.
The strands should be of the same lengths so that your finished rope would be fine and firm.
Colors of paracord- which to buy?
This question is important not only in design: the color choice of the cord (and your ropes in general) should be chosen consciously.
For example, you should choose a bright cord in case you plan to go for a two-day adventure in the woods so that other people would see you from far away. Or, for instance, in case you plan to bug out during SHTF, you should buy camouflage-like cordage so that no one can track your movements.
How to twist rope?
The technology is simple, and it was developed back then, in prehistoric times. All you have to do is spin one (or multiple) strands of string in one direction. Afterward, you should spin it back on itself in the opposite direction. It is a very fun thing to do!