Introduction
Warmth and the ability to heat up yourself and food are essential for survival. Having an opportunity to heat up survival food and water is a must for survivalists, homesteaders, and preppers. For that, you will have to demonstrate some efficient survival skills and situational awareness. Besides, your survival backpack full of good quality gear is of great help, too. Being able to use your knowledge in a stressful situation is what every beginner survival enthusiast should know how to handle. DIY is always a budget option, but you should learn how to do actually it. Read the article and find out!
To the point
Survival is not just about buying tons of useful emergency items to sort them out and keep them safely contained until the day comes. In reality, the true essence of survival is the ability to make something out of virtually nothing to stay alive or, at least warm.
Should you find yourself in a situation that took you by surprise with your valuable survival equipment out of reach, or your bug-out bag lost during the emergency stampede, you would have to rally on your DIY skills to make tools and weapons that would help you last and see another day.
In this guide, you will be introduced to one of the multiple skills of DIY equipment making – you will learn how to make a DIY hobo stove. A quite simple yet efficient item that will mean the world to you should you find yourself out in the cold and wind in need of hot food or just a cup of coffee.
Or we could contemplate more everyday situations like a camping trip. Knowing how to make a hobo stove out of everyday stuff that you may see lying around at your feet is a great skill to make sure your camp will always have a place to cook and keep your fellow travelers warm.
What is a Hobo Stove?
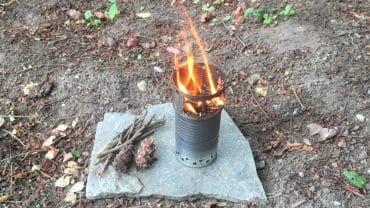
A hobo stove is a term for a DIY camp stove that you can build virtually out of things you find around yourself in an urban area. Those things include trashed tin cans of processed foods, empty paint cans, or other metal containers that you can find. A hobo stove is great to cook or heat survival food, boil water, or just to keep yourself warm.
When properly built, hobo stoves are fuel-efficient – the fire inside is directed towards a frying pan or a pot and is protected from the wind. The air vents drilled or punctured in the walls of a hobo stove get the fire burn brighter and give more heat.
Hobo stoves are fueled with wood, paper, and other inflammable objects. But it is best to use materials that don’t emit poisonous gases as they burn. This is especially important if you use a hobo stove for cooking.
The first examples of the use of hobo stoves go back to the days of the Great Depression. As you might guess, hobo stoves get their name from the term hobo, which means a homeless person. Those unfortunate people have to ensure their survival in a day-to-day struggle finding any available objects that they can put to use. This is pretty much what an experienced prepper should be like – ready to meet hardships and challenges without fancy equipment but rather making survival tools using their own skills.
Making a Hobo Stove in a Nutshell
So how do you make a hobo stove?
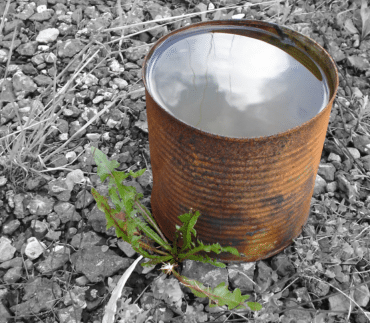
Basically, building a hobo stove is very easy. The first thing that you need to get started with is an empty tin can – a canned food tin can or a coffee can will do. If the can is not completely opened – the top of the can is not totally removed, you can remove it using a can opener or (if you don’t have a can opener) applying one of the methods of opening tin cans without proper tools. One of such methods is using a street concrete curb.
When you’ve had a can’s top removed, it’s about time you proceed with turning a useless piece of metal into an efficient cooking/heating device. But hold on a second – there is something important we forgot to want you about.
Even though we told you that you could make a DIY survival stove out of water materials that you can pick off the ground around you still, there are parts of this task that will require a minimal set of tools. At least, you should have a knife. The best option is to have a multitool – a portable set of tools such as a knife, a can opener, a saw, a screwdriver, and players combined into one device. Our opinion is you should have such a thing with you at all times no matter where you’re going. Multitools are typically compact, so there should be no problem carrying one of these in your pocket or have one inside your backpack. They are extremely lightweight and take next to no room. After all, you never know what kind of a situation you may end up in. And with a portable multitool in your pocket, it’s better to have one if you don’t need it than to need it when you don’t have it.
So for the next few steps of making a hobo stove, you will need something to cut through the metal – a knife, a multitool, or tinner snips.
Use any of the aforementioned tools to:
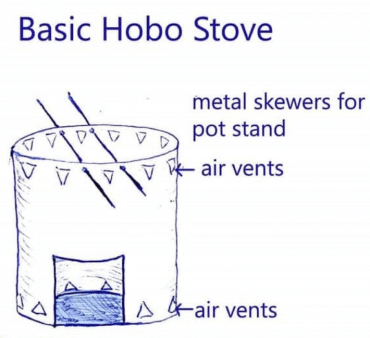
- Cut a hole in the bottom side of the can. This hole will serve as an entrance for fuel like wood, grass, paper, etc. Because of its design, you won’t be able to use the top side of your hobo stove to put fuel through – it will be occupied by a pan, a pot, or a kettle most of the time. Another function of the hole is giving access to oxygen.
- Puncture smaller holes all around the upper side of the stove. These holes will serve as air vents to let the smoke out and preventing the fire from dying out. Air vents are essential for keeping the fire burning, so feel free to make as many of them as you possibly can.
- Make a few smaller holes in the bottom part of the can. They will also drag extra air inside to boost the flame.
Your next step is to prepare for starting a fire:
- Find some paper, tinder, or any kindling.
- Collect dry tree branches and other materials that you can use as a solid fuel to feed the fire as it burns.
So here you have it – your own DIY hobo stove ready to go. But there is still one thing to take care of.
Your stove’s top is not good enough to safely use it as a pan/pot stand. Its diameter is likely not wide enough to hold a pot or a pan without letting it topple over and fall to the ground, putting all your work to waste. Our advice is to look for some wire mesh, grill grate, or some other thing that creates a stable cooking surface. A coat hanger made of steel wire is also a good option. Simply place any of the listed things on top of a stove, and you’re good to go.
As soon as you’ve had it done – proceed with cooking and enjoy your meals.
A bit of advice
As useful and practical as they get, DIY hobo stoves still have one common downside – they won’t allow you to control the intensity of the fire. So you basically have a flame that burns without any option to make it more or less intense. The solution to that issue is a damper.
A damper is a sort of door that you have installed on the stove. The more you open this door, the more you control the intensity of the fire. This will give you more cooking options.
Five Different Ways to Make Hobo Stoves
Now that you know the basics of making DIY hobo stoves, it’s time to introduce you to the five different methods of building one. These options will get more advanced as we go down the list.
1 – Basic hobo stove
2 – Ash stand model
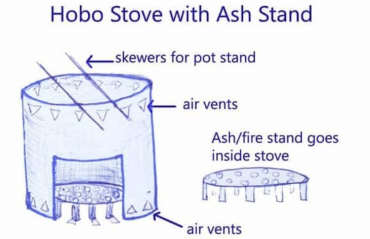
To make an ash-stand hobo stove, you will need a bigger can. Paint cans are perfect for the task. The stove part of this model is pretty much like the basic hobo stove that we’ve already talked about. Making an ash stand will require a piece of metal that is virtually the same size as the stove’s bottom.
Puncture several holes in the metal and then use tinner snips to cut the legs of a future ash stand. Next, make slits all around the metal’s diameter and fold every other one. Then place a stove over the ash stand.
3 – Ash stand model w/ two cans
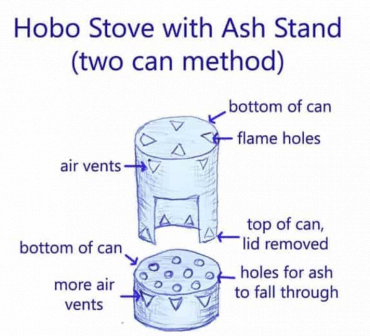
The second can is used to make a taller ash stand so that it will accommodate more ashes.
4 – Hobo stove w/ a damper

5 – Hobo stove w/ heater

Hobo Stove vs. Rocket Stove
Rocket stoves are options of DIY stoves that require two cans. Although, you can make a rocket stove using bricks, clay, or cinder blocks. Another thing that sets rocket stoves and hobo stoves apart is that the former can produce more heat. Regarding what you should consider the best option, we would say that a hobo stove is easier to make, and thus it is a perfect survival DIY heat source for many campsites that might lack resources.
DIY Hobo Stoves Alternatives
In the final section of our article, we would like to give you a list of the best DIY hobo stoves alternative products that you may buy online and have shipped to your country. These are high-quality outdoor items many preppers and camping enthusiasts choose.
Kelly Kettle gear
Kelly Kettle company is one of the best online stores to buy stoves, scout kettles, and camping kits. Kelly Kettle products will be a centerpiece of your camping experience.
The top Kelly Kettle article-related products include:
- Kelly Kettle Fire Base – a firebase is an item that is crucial for making a fire in a dry environment to prevent wood fire. (The firebase fits base camp and scout models.)
- Kelly Kettle Hobo Stove Accessory – this hobo stove accessory is basically a pot stand. You can use virtually any size pot or pan with it without worrying they will fall to the ground as you cook.
Other brands
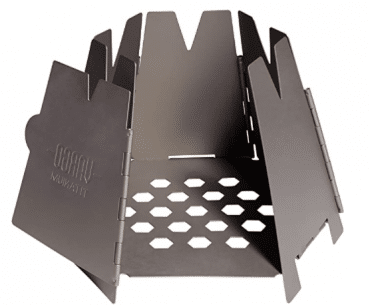
- Hexagon – a wood stove by Vargo.
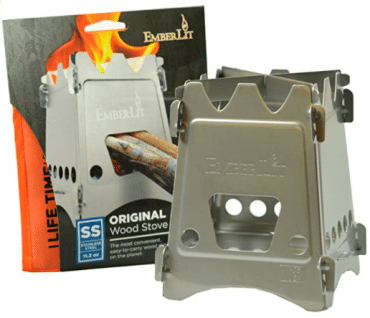
- Titanium UL – a survival stove by Emberlit.
Conclusion
Even though you prefer buying high-quality survival products, learning some DIY tricks is just as important. We hope that our guide has been helpful. If you already know how to build your own hobo wood stove using everyday materials, don’t hesitate to leave your own review on your personal experience.
Frequently Asked Questions (FAQ)
How to make a coffee can stove?
Making a DIY coffee can stove will require a tin can, a knife, and plyers. First, make holes all around the top and the bottom parts of a can – this is necessary to ensure excessive air ventilation for the fire to burn. Next, turn the can upside down – the open side of the can should face the ground – and make a bigger hole so you could put wood, grass, and other flammable materials through it. Finally, at the top side of the can – the sealed one – make four bigger holes so that the flame will go through them. You’re done – now you have an improvised wood stove.
How to make a little stove?
To make a little stove, you will need an empty can and a minimal set of tools like a knife, a screwdriver, and plyers. Your best option is to have a multitool. First, at the bottom side of the can, make a bigger hole to put fuel through. Next, make several smaller holes all around the top and the bottom sides of the can – these will be air vents and exhaust vents for the smoke. If the can is opened on both sides, you will need a pot stand. Use a piece of stiff white (like a coat hanger, for instance) to place it over the top side of the can.