It is only undoubtedly, survival skills and useful hacks come in handy when it comes to a planned preparedness and survival. If you’re in the backcountry, the long trek, or somehow globetrotting in the deepest corners of the globe, the practical knowledge of making lye could help in several ways. Or, you might be just randomly scrolling the page and feel a little curious about its heading – let us reassure you it’s worth learning about this substance as it indeed has a rich backstory and (still) enough applications for various purposes.
So today, we are going to learn why lye is useful in the wilderness and how to make lye yourself (caution: a bit of theory, special consumables, and self and home-protective gear are strongly required for producing homemade lye).
What is Lye and Why Might One Need It?
Lye: Potassium Hydroxide With Mighty Powers
To start with, in a broad sense, chemical solutions containing some kind of alkali (mostly caustic) are commonly called lye. There are two similar yet slightly different chemicals called lye – the sort of lye produced from wood ash and the so-called sodium hydroxide having salt as its main compound. As an alkaline solution, lye can comprise various salt-based solutions, especially those obtained during the extraction of substances not completely soluble in water or that remain after the crystallization of salts. If you hardly have any notion of what lye is and how to make lye, you surely know and apply soda (or potassium hydroxide), so lye is also called caustic soda due to its strong base pH level of nearly 13, estimated by a pH meter.
How is lye water applied?

Lye used to be widely applied centuries ago and was a multi-purpose means very desired in the household – basically, up to the present, it would help in:
- doing the laundry and washing things;
- making soap;
- dressing leather;
- curing certain foods;
- preserving some products and cooking technology;
- as a cleaning product;
- rinsing hair in pre-shampoo times to soften and fluff them.
Centuries ago, before the advent of soap, people made lye by leaching water through wood ash layered in a barrel or other canister.
Lye is not all about the past, though – today, the homemade lye solution is still required for making craft or other liquid soaps, used as a strong cleaning substance and purifying remedy, so it is required for industrial technology – for instance, in refining aluminum and more. Yet today, we are going to focus on how to make lye in its prepper or survival version – how to procure wood ash lye and lye water from scratch when outdoors.
Sodium Hydroxide vs. Potassium Hydroxide
There are some meaningful step-by-step instructions on how to make homemade lye on the Internet so that you can further use it for a homemade soap recipe, disinfector, or cleaning fluid. And now, let’s pretend we are in the wild and we only have ashes from our campfire and some rainwater – what should we do?
Making Lye: the Basics
Proper survival gear has great importance in lye-making. Elementary safety measures are as crucial as ash and water in the process we will describe below.
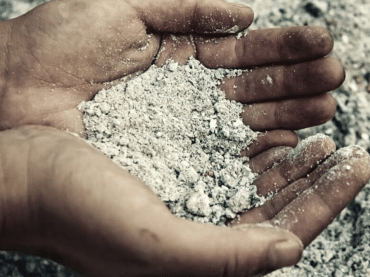
You have burnt a lot of hardwood ash and do not know what to do with it? – just collect it, and it will serve you as a good basis for potassium hydroxide lye. To collect ash properly, you will first need to bring a wooden barrel (a strong plastic barrel will go, too), metal containers for the ash, a rain canister for the water, and safe containers to store leached lye water. You will also have to make small holes in your barrel, so a tool for boring, such as a drill, would help. Besides, the whole process will be far easier if you manage to find straws, dried grass, and tiny pebbles. pH testing tools, be it strips or a meter, are optional yet useful for examining the lye consistency.
Bear in mind that some protective equipment, including rubber gloves and boots, safety glasses, are recommended to treat the lye water harmlessly and cautiously.
Step 1. Collecting the Ash Right
Step 2. Gathering Rain Water
As fire does not destroy potassium, its nutrients can be leached out with the help of water. If you are in the wilderness, you have probably thought of collecting rainwater for several purposes – soft water is not rich in minerals, and this fact will only foster the process. Hard water would literally make it hard to extract lye since it contains dissolved minerals (for instance, when making soap, lathering would not be possible without soft water, either).
Place the rain barrel under the eves of your house to catch as much water as possible. You will need to have a filter on the top of the barrel to keep out any debris and leaves. Collect about 10 pints/4.7 liters to make the lye.
A simple way to gather water is to put a rain barrel under the roof and add a filter on its top so as the leaves and other litter do not infiltrate through it. To make lye water, nearly 4.7-5 liters or 10 pints will be enough.
Step 3. Getting a Wooden Leaching Barrel Ready
Pour the rainwater into the barrel (a four to the five-gallon bucket is fairly enough) and add ashes. To make the liquid drain out of the barrel’s bottom, you will need to drill several holes in the center of the bottom part (a bit of smaller size is better) – 5 to 8 holes are enough. Not to lose the liquid, you will have to put a bucket underneath the barrel so that the holes are located above it.
Making a natural filter would be your next step. First, prepare a layer of pebbles: collect and rinse them before placing them onto the barrel’s bottom. Your layer should be about 1 to 2 inches (apparently, the pebbles should be bigger than the holes you drilled). Proceed to collect straw and lay nearly 3 inches onto the pebbles. This plain technique will work efficiently, letting the water slowly drain out.
4. Placing the Barrel Properly
How to put your leaching barrel right? – Sure, you have to seek an even location for it; it should preferably be protected from rains and winds. If placed by the rain canister or barrel, transferring the water would be an effortless process. Remember that you will need to have enough space underneath the barrel to collect water comfortably, so procure some solid blocks or frames of wood to raise your barrel and fix its position properly. Take a metal canister or bucket and place it underneath – the bucket should be in line with the holes you drilled in the barrel’s bottom. Ideally, if you manage to find a cast iron or stainless steel pot (otherwise, special heavy-duty plastics) – these materials have proven to be lye-safe, contrary to aluminum.
5. Mixing Ash With Water
Remember that you put aside your canister with white ash? It’s high time you placed it into the barrel. Fill your barrel with the hardwood ash (4 inches of the barrel’s top), pouring it on top of the straw or dried grass. Fill your buckets with the rainwater or distilled water and then gradually pour them into the huge wooden barrel: begin to carefully pour the rainwater you collected over the ash – it should be quite wet, not soaking. When you see the waterline and the ashes start floating, it’s time to stop (the consistency should remind that of a milk cocktail).
The amount of rainwater buckets you add defines the amount of lye water you plan to procure (similarly, the amount of lye-safe buckets should correspond to the amount of water added to the barrel). A lid is not required unless heavy winds or rains are there to hinder the whole process.
6.Gathering the Lye Water
We have already mentioned above the protective equipment, which is highly desirable when proceeding to step 6: we recommend you to wear gloves (elbow long ones are preferable), safety glasses, and boots before gathering the caustic lye water. The best moment to start is when water is nearly 4 inches from the bucket’s top. Slowly take off the full bucket so as not to spill, and put in its place another lye-safe bucket.
7.Estimating the Strength of Lye Water
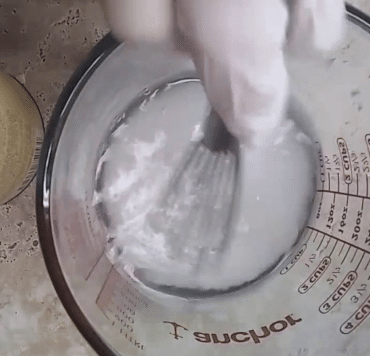
As we have already outlined, the pH defines the strength and thus the purpose of your solution, so it’s the crucial step to define and alter the pH of your liquid lye. The easiest way would be to bring special pH test strips or a pH meter – but now let’s pretend we have neither in our forest camp. Surprisingly, a mere potato would help! – this is a sure thing in our Bushcraft backpacks saved for the evening campsite fire. Lower it in the liquid, wait and see: if it floats, the lye is probably ready and sufficiently concentrated; if potato sinks, it is not yet. However, if it floats too easily, it might already be too strong, so adding a bit more water will not hurt. Variant 2 is quite similar but with an egg: if the button-sized area of the egg floats and does not sink, the lye is sufficiently concentrated, as well. If you see there is some excess water, you might concentrate the solution by simply heating it.
Pro-tip: the adequate pH of each of your buckets should, in the outcome, be around 13 or even slightly more.
What to do if the pH is below 13? Flow lye water bucket back into the wooden barrel and gather it once again -yes, this action is going to be repeated until your pH reaches the desired 13. At least two more times. Wearing gloves is strongly recommended so as not to spill the liquid containing chemical contaminants on your bare hands.
8.Applying Lye Water Right
Frequently Asked Questions (FAQ)
Do ash and water create lye?
Wood ashes comprise alkaline components in the form of potassium carbonate (pearl potash) and potassium hydroxide (potash) – they dissolve easily in the water. As lye reacts with water, it will issue ph-saturated hydroxide ions (pH 13). Thus, lye is not hard to produce by mixing wood ash and water. If you add fat, stir and boil it thoroughly, you will get a basis for a DIY soap.
How much is lye for soap making?
The price can be very different depending on the volume and manufacturer. Basically, you will need a foolproof 100% sodium hydroxide for home soap-making, no more than six or seven pounds. Before you proceed to make soap from DIY lye, browse through the manifold offerings of readymade quality lye on Amazon.com or Walmart (varying from $8 up to $60) and decide for yourself (keep in mind the potential extra costs for shipping).
Can we make soap without caustic soda?
The easiest means of making soap without preparing lye is by using any melt-and-pour soap. This substance has already undergone saponification – the reaction of oils and lye – and thus, the whole process will be simple and safe as sound.
Will lye dissolve wood?
Yes, you can play this trick using lye, or NaOH, and some wood materials. But it will not work on PVC or ABS. Still, some preparatory actions are required: take a log and drill 5-10 holes in it – this will provide a better result; grab a decent amount of lye powder and fill the holes with it; once you make sure there is enough ash inside, proceed to add some water.