Introduction
You should take care in 2023 to develop your expansive knowledge and survival skills first. Without them, your survival chances will be minimized, just like without a good medical kit. Of course, every prepper, survivalist, and homesteader should have different methods of survival. But they are united in their preparedness for any emergency. It implies survival skills and situational awareness, your survival bag properly packed, your ability to find or build a survival shelter. With all that, even the worst ever economic collapse or off-the-grid situation will not affect you much. Learn more in the article!
To the point
You can be an expert in many topics concerning survival in nature or during an emergency. For example, you can perfectly know how to start a fire or how to store food. However, all this knowledge can be useless if you or those close to you suffer because nobody can stitch a wound or use medical glue properly.. So, knowing the right technics of stitching wounds and having the proper gear for it is exceptionally crucial for everyone. And this article will tell you the basics about this life-saving skill. Knowing how to put a triangular bandage is essential as well.
What is Stitching?
Let’s start our journey from the definition of stitching or how it is also called “suturing.” So, suturing or wound stitching is an emergency medicine technique of closing a wound in a body by using specialized and sterilized thread and needles. This operation is performed where there is a necessity to stop bleeding and prevent infection from a big wound on a human body that would not heal naturally. Stitching brings all parts of wounded tissue together, ensuring that no infection will have a breeding ground in the body and helping the organism to start the healing process. In some cases suturing can even save detached limbs such as fingers.
From the previous paragraph, you can get an impression that to suture a wound is a difficult task usually performed by medical staff, and it is far-fetched that you will ever need those skills. However, the situation is not that simple. In reality, it is very easy to imagine that you will need to go with a needle and thread under your friend’s skin to suture his wound.
For example, you could go to the mountains where the nearest hospital is more than 700 miles away. And your friend, hiking through the forest, receives a very deep wound so you can even see his bones. And now you need to take care of your friend because you cannot leave him in the middle of anywhere, even if you wanted to, because he just spoiled your vacation. And in this precise moment, you will need to know how to suture because deep wounds can not heal themself.
The gear
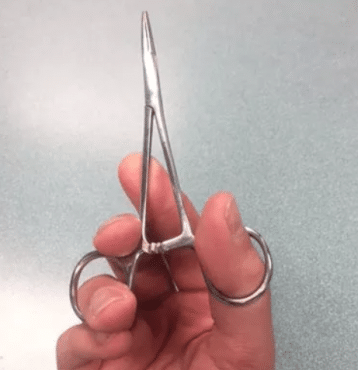
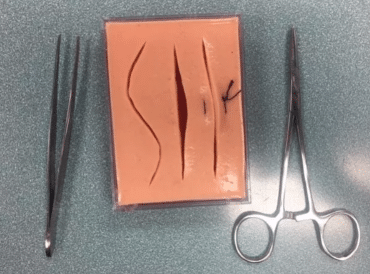
Before we answer how to stitch a wound, I need to say a few words about all the required gear. The bare minimum would consist of suturing kit which contains such objects as:
- a needle driver that holds the needle while you are pushing it through the tissue
- tissue forceps that help you to move around the tissue, scissors to cut the thread
- last but not least, sterilized typically curved needles and thread
You can find all these objects in local pharmacies or on the internet. You must pay a lot of attention to keep these instruments sterilized because you do not want to put an infection to your or another body by using unsterilized tools. If you are not sure that devices are sterilized, try to use sterilizing alcohol wipes before stitching.
When Should I Stitch a Wound?
As I have said above, suturing is used only in a significant wound or heavy bleeding. So it is better not to use stitching when the wound can heal naturally or with simple bondage because suturing bring unnecessary risk, so make sure that the wound is severe. Suppose the bone on the bottom of it is a good indication that it is time for suturing. If it is the case, and you are sure that this operation must be performed, you, first of all, must consider the possibility of bringing a wounded person to the doctor. Professional medical personnel would effectively suture a wound with a higher chance.
Moreover, when stitching a wound, doctors use certain antibiotics and drugs so the person will not feel the needle in the body, which relieves the pain for them and makes the doctor’s work easier. And the chances are that you would not have such drugs with you so that the stitching would be very painful.
In addition, if you find a doctor, you would not take responsibility for performing a serious operation which can leave a terrible scar on the person at best. Consider getting a healing salve in order to cure your wounds.
Therefore, you must consider suture as a last resort and perform it only when there is no other choice, and you can not reach medical staff because you are literally in the middle of nowhere. Remember that even a vet doctor would be suitable for stitching a human body.
Practice Makes Perfect
Now when you know what you need to suture a damaged wound on human flesh and when you have to do it, it would be good to remind you that before practicing suture on the humans, you have to find something else.
The good news is that you can easily find an object to practice on:
- The first such object can be a bit unexpected because it is a banana. Indeed, it sounds strange, but bananas have a structure and texture that are very suitable for stitching practice.
- The second object is a chicken breast with skin. It would be a perfect practice because chicken skin has a structure very similar to human skin.
- The third and probably the best object that you can find in your household for practice is a pig’s belly. It is great because the pig belly has all the tissues and the structure that humans have. Many doctors started with pig bellies before practicing on humans. A pig belly has muscle, fat, and skin that resembles human skin but is thicker, so you have to be very careful with your needle.
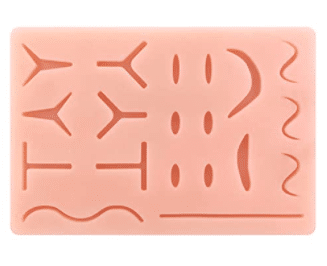
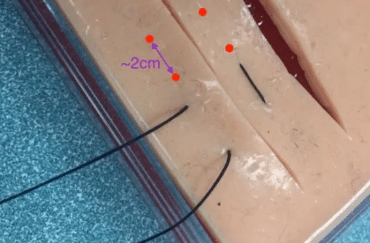
- The last object suitable for suturing practice you will not usually find in your basement, and this object is a suture pad. The suture pad can be easily found on the internet, for example, on Amazon. The price is about 20$. The material is latex with pre-cut wounds. The best thing about these pads is that you can use them multiple times, unlike pigs or chickens.
So, How to Stitch a Wound?
Now, when you know the basic information concerning suturing of a human body, I can finally tell you how to stitch a wound. In this article, I will tell you how to stitch a wound using the easiest technique of suturing, which is called an interrupted suture.
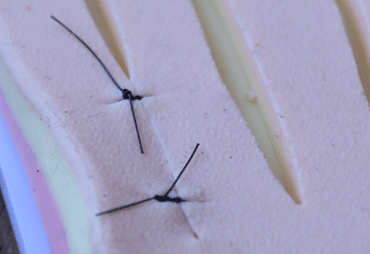
This technique is called an interrupted because different stitches are not connected, so you do one stitch, tie it, and go for another one.
This type of suturing is very secure, simple, and flexible. If you made a mistake, you can just cut the wrong stitch and not open the whole wound. Also, it is very easy to adjust.
1 – The start
You must start suturing a wound by washing your hands. Do not forget to wash your hands carefully like a doctor because you have to reduce the risk of infection to a minimum. Afterward, you have to prepare a wound or wounds for the operation by removing all foreign objects from it, and from the skin for this task, it is better to use water, also try to clean as much blood as possible. When you finish with it, put on your latex gloves.
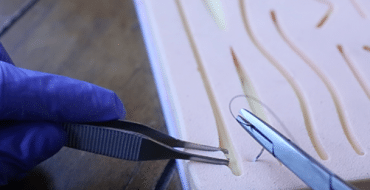
2 – Hold tools properly
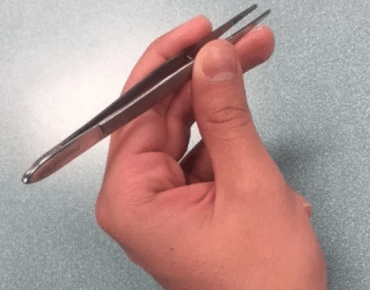
Hol the tissue forceps the same way you hold a usual pen between them and index fingers.
3 – Start stitching
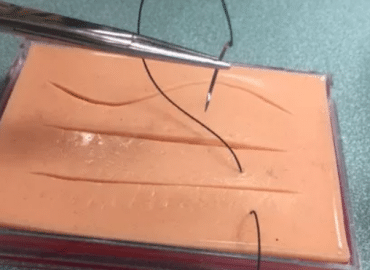
You can start stitching when the wound is clean, and the needle and thread are in your hands. Firstly, with a needle driver, you must take the needle, do not forget to ensure that needle clamp locks are in the proper place. Furthermore, you have to remove all the thread from the aid kit.
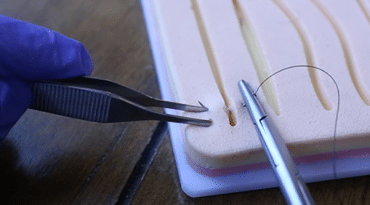
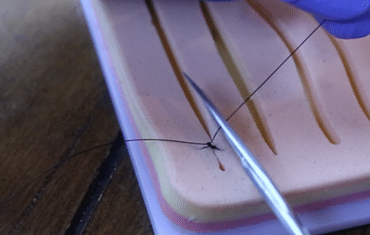
- At this point, you can finally puncture the skin of the wounded person. To do it, you have to push the needle through the skin at a 90-degree angle. The needle must not go deeper than 1 centimeter. Remember, that needle always goes from outside to inside.
- When you feel that the needle is deep enough, twist your hand about half a circle clockwise, that the needle will come out from the other side of the wound. The needle must come straight across the hole.
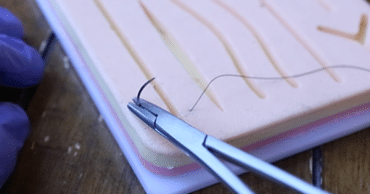
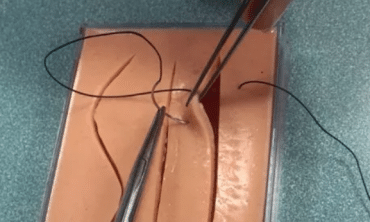
- After the needle comes out on the left side of the wound, you have to unlock the needle driver and relink it at the tip of the needle. Then, pull the needle until 1 or 2 centimeters of the thread is left on the first side of the wound and realize the needle.
- Next, use your hand, take the thread, and wrap it around the needle holder at least twice. Then, open the needle holder for a bit and take 1 or 2 inches of sterilized thread on the first side of the wound.
Now you have to create a simple overhand knot with two loops, sometimes called the first throw.
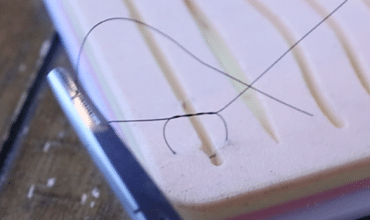
- Afterward, take both ends of the thread and tight them so different sides of the wound are touching each other, do not forget to make sure that the knot is lying flat.
- Now, when you finish the first throw, you can go for a second throw. To have it done, use your left hand, take the long end of the thread and wrap it around the needle driver. You have to move the thread clockwise but only once. Open the needle driver a bit and take the thread from the shore end. Pull the long end of the thread with your left hand. Now your surgeon knot is done.
- At this point, you can cut the excess thread and move for 1/4 of an inch and repeat the process. When finished, make sure that all the knots are on the same side. Also, wrap the wound in a sterilized bandage (you can use the butterfly bandage) and try to get to medics as soon as you can. Remember that you have to make a new suturing after seven days at maximum.
Useful tips
1) When you pull the thread, do it very slowly and carefully, so the patient would receive as minor damage to the skin as possible because such an attitude will reduce scarring.
2) It is better to double sterilize your hands and instruments, especially if you try to suture a wound in nature because only ideally sterilized instruments are free from infections.
3) Make sure that skin from both sides of the wound comes together before you make a stitch because otherways the risk of infections will be very high.
4) Tigh the surgeon’s knot so it would not touch the wound.
5) If you do not have any sanitizers at hand, you can sterilize your instruments with boiling water. However, remember that in this case, you will not have a 100% guarantee that all the infections died because some of them can withstand boiling water.
Another essential five
6) It is better to purchase sterilized suture threads in advance because, unlike other tools, you can not just sterilize dental floss by boiling.
7) If you have trouble puncturing the skin, apply direct pressure to the needle holder. However, be very careful because you do not want to damage the tissue beneath the skin.
8) Remember that suturing ensures that infection will not come inside the wound by closing it, so make sure that the wounded person will not move a lot because the wounds tend to open again, and you will need to do all the job again.
9) Do not forget to cut excess thread because it can cause the wound to open again. Also, you may need the leftovers for the future.
10) Also, remember that if you start from the right side of the wound, you have to make the thread wrapped around the needle driver clockwise. If you started from the left side, do the opposite.
11) When you finish, make sure that you are not leaving foreign objects in the human body.
Horizontal Mattress Suture
The type of suture described above is the easiest one but can take a very long time which you do not always have. That is why I decided to describe one more technique which is called horizontal mattress suture. This technique is considerably faster but not as safe as the previous one.
- So, you have to start from the 1-centimeter bite inwards from the wound’s side and leave 3 centimeters of the thread. Afterward, take an outward bite which would be parallel to the previous one.
- Moving along the left side of the wound, you have to take a new inward bite after about 2 centimeters from the first needle hole. Now you should see a line between second and third bites.
- Now, make the last bite of this suture, which should be placed right across the third one. Also, you have to take it about 2 centimeters outwards.
- When you finish, you have to make an instrumental tie and cut the thread left.
Frequently asked questions (FAQ)
What is used to stitch wounds?
As I have mentioned above, many suturing techniques and instruments can help you to suture a wound. The must-have tools are sterilized needles and thread, latex gloves, needle holder scissors, and butterfly bandages. Also, it is better to have sanitizer and a whole suture kit.
When should you not stitch a wound?
First of all, you should not stitch a wound if you do not know how to stitch a wound, because in this case, you will only make the situation worse. Also, you should not stitch a wound when it is possible to receive proper medical sutures in several hours because professional suturing would always be better with minimum chances of getting an infection.
Moreover, a sutured wound after a professional treatment would not leave any scars or only small ones, while suturing in nature can end bed for the beauty of the body. In addition, I have to say that you should not make interrupted sutures if the wound is not dangerous and can heal naturally because otherways you take unnecessary risks.
Does stitching a wound hurt?
In short, yes, it does. It can feel like an extreme pinch under your skin. And that is the reason why in hospitals, doctors make this operation under specific drugs that relieve the pain. The worst news about this is that even if you know how to stitch a wound, there are no ways to puncture human skin without pain. Therefore be prepared for the unpleasant experience, especially if it is your first suture. And this is one more reason you should seek professional medical aid and apply sutures by yourself only in desperate situations.