Making fire is one of the topmost important skills. You can make fire with different materials, such as bark, old grass, and coal. Learn how to make a fire and what a hand drill and a bow fire drill are. We will explain how to make a tinder nest and place it on a fireboard, how to get the right friction and pressure, and how to make fire with a flint and steel or a lens. Read our article to learn how to get from a hot ember to tinder to kindling with ease.
Overall, there are three usual ways on how to start a fire with sticks: a bow drill method, a hand drill method, and a fire plow method.
Every strategy has its advantages and disadvantages; yet, one should strictly follow the guidelines to be effective. It’s tough to be effective in this tough process (we will speak about this a bit later); moreover, it is almost impossible—without utilizing appropriate techniques—to start a fire with sticks.
In this article, we are going to depict every one of these three techniques in detail (accompanied by clear and entertaining videos), discussing precisely the best methods to start a fire with sticks in a survival situation; on the whole, we should discuss the reasons this survival skill has to be acknowledged by everyone.
Why it is Crucial to Know How To Start A Fire With Sticks
When you hear the expression “Wild Survival,” what is the 1st idea that comes to your mind? I hope important survival skills, for example, water obtainment and shelter-building, ring a bell. What is more, I hope that lighting a fire was as well your initial thought!
But why? Because fire is damn helpful in desert emergencies. It is needed for many reasons: warmth, flagging, cooking, self-defense from wild animals… and survival. What are the two things that go together, like shots and firearms? The surviving itself and the fire-starting!
Survival and fire should simply have a special spot in the heart of each survivalist…
For example, when all faith and hope appear to be lost when one is wandering in the woods, a fire will ‘light’ some truly needed motivation to change things for one, keep one on the go, and inspire.
“If you can make a fire… you can make it” – this expression serves pretty well here. Just feel it.
Or then again, as the blind priest in the vivid movie-tape, Frankenstein said, “Fire Is Good. Fire Is Our Friend”.
It is vital to have an option to light a fire, make a retreat, and make some self-made endurance weapons from environmental raw materials available. And this essential ability, to get by with just the things you can search and reach during survival, is named Bushcraft. What’s more, in the wilderness survival, Bushcraft’s abilities play a crucial role.
Regardless of whether you’re a camper, climber, explorer, tracker, or fisherman, the fire starting process is a basic survival ability you should perform. These abilities can be helpful not only for survivalists! It’s one of the numerous basic self-reliance abilities that may some time or another save your life. So, just to be assured that you will be safe someday, you should get familiar with this skill.
Then again, without a doubt, fire is great. It is our companion! It is said that fire is simple, isn’t that so? Simply load your 1.50 dollar gas station Bic, hold fire to the wood, and here you go, you got yourself a blasting, warm campfire.
Yet, let me ask you some strange but evident questions:
- Do you usually have a lighter with you?
- Have you been in a terrible situation when you forget to pack a lighter?
- Did it get taken by TSA air terminal security?
Truly, lighters run out of liquid, and matches get wet, and both are famous for disappearing when you need them the most. While on the other hand… sticks! Yes, those can be found almost anyplace.
Figuring out how to start a fire with sticks isn’t a survival skill you WANT to be forced to utilize; nevertheless, it’s a skill that each equipped survivalist should be able to perform perfectly.
Frictions: Instructions on How to Start A Fire With Sticks
Lighting a fire with sticks is right now reduced to tackling the physics of friction: every one of the three strategies mentioned in the very beginning shares this friction, or, in other words, ‘grating’ idea. So let’s now get along with the overall thing of how rubbing makes fire. Then, afterward, let’s jump into the peculiarities of each of the particular techniques.
Planning Is Crucial
On the off chance that you get the preparation part right, you’ll definitely expand your chances of success. Planning incorporates:
1.Obtain the Usual Materials for a fire
- Get a dry straight stick (or have a fire starter stick)
- Get a dry flat piece of wood, and it will be needed to make a fireboard (or fire pit)
- Create a dry and fine tinder bundle
- Have a lot of kindling (you can do it out of everything, from cedar bark shavings to herbivore dung)
- Have a huge amount of dry sticks
The prime concern in all this process is that you should utilize dry wood. In case the wood with dampness is chosen, or if the wood is wet, you are putting yourself in a critical situation in which you may experience some bad (unsuccessfully) outcomes.
Do not underestimate the value of this move!
So by choosing strong wood with deficient dampness levels, you will do this thing right. Why? Since dampness is a fire starter’s kryptonite.
If the amount of dampness in the wood is huge, one will require more friction to make an ember and have less possibility of success. A prepared piece of wood is excellent. However, any other fire starting dried-out piece of wood would as well do great.
2.Organize the Materials
One must have the tinder bundle and fuel organized so that the materials are close by. All of this is pretty much incorporated in a fire starting 101.
The way toward going from coal to fire is named “working a fire up the ladder.” The guide is as per the following:
- You start with a warmth source or fire. For the ember to grow big, you need to find dry and excellent tinder.
- At that point, this tinder bundle gives a satisfactory amount of energy to let the fire grow bigger. Afterward, employ some kindling to make the fire even bigger.
- Then, at last, the fire is pretty much able to catch logs and little dry sticks.
Wanna get from a little fire source to a thundering fire? Then this is one of the methods in which you can go for it. You’ll see that it is much harder to start a fire if you avoid these planning steps. Of course, except if you have something to fuel up the flame, for example, gas.
Once again, before starting the whole process, one must gather some dry fuel: old plants, pieces of restored wood, dandelion fluff, dead grass – my favorites. This will go about as your tinder bundle!
To cut a long story short, if a tinder bundle is great, then it means that it’s really flammable. Again, try not to undervalue this step. Be careful. You’ll experience a tough time moving the fire from your hot ember to the tinder bundle. Perfect condition of the tinder bundle is needed in case you want to make all things perfect. It should be dry and fine. Additionally, try to find bigger twigs and sticks to take care of the fuel and feed the kindling.
Kindling, by its nature, is wood way bigger and generally more fundamental than tinder; flammable materials, for example, dry cedar bark, pine shavings, and needles are generally perfect kindling alternatives; moreover, each one of those sticky dried softwoods burns really quickly. Then one must add these more slowly-burning wooden (not only wooden, as already mentioned) pieces to your fire after lighting it with the tinder bundle.
Basically, that is it. We present you with a quick summary:
- One should find all the required materials.
- Make sure to plan materials for an ideal organization: set up all the needed things, the fire-starting materials composition.
- One will have to do LOTS of friction following one of the 3 ways of fire-starting we have already mentioned.
- The friction development will turn the friction point from the wood into a hot ember.
- Rapidly move the hot ash into your tinder bundle and blow smoothly (this lights your tinder package)
- Snatch the kindling and utilize the growing & burning tinder bundle to light it up
- Continue to add bigger, dry sticks to make an enduring fire.
Increase your knowledge of survival topic, go on reading our extensive survival prepping guide. In our blog, get to learn a lot of interesting facts about the modern survival gear, advanced survival skills, and everything else for real preppers, efficient homesteaders, and strong survivalists!
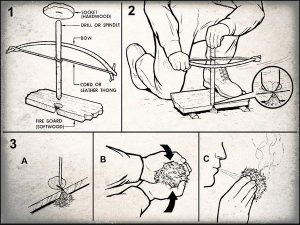
Using Hand Drill While Producing Fire with Sticks
A fire drill is a tool known as the easiest method to make lots of incendiary friction; it is a tool built of sticks and wood, and this thing looks just like it sounds. The whole setup shows a drilling press design that one might see in a metal manufacturing store.
It’s basically a long, straight, dry, durable stick (spindle) with one end honed and a flat bit of wood; the stick’s sharp tip (this one end) is placed at an opposite point onto a fireboard – a flat bit of wood. In any case, one must begin with the required material selection before drilling. The essential elements are the sticks and the fireboard.
As we addressed right off the bat in this article, the wood materials should be dry. The drier – the better; once everything has been obtained, all the materials, then it’s an ideal opportunity to zero in on making a huge amount of friction!
Presently with this fire drill setup, one must place the open hands on any side of the spindle. Palms flat, the stick should be placed among palms, and you rub your hands together, making the spindle spin. The spindle’s whirling process at that point moves rotational energy through friction at the purpose of contact between the spindle and the fireboard.
Master Tip: If you put the foot on the fireboard, then it will keep it consistent while you are whirling!
The rubbing is made by whirling the sharp spindle with your hands in a hand drill method. Simultaneously you must add the downward pressure through the spindle into the fireboard; not to mention, the blend of pressure and spinning, throughout some time, makes the exact friction buildup needed to make a hot ember!
Master Tip: Make sure that it’s good to make a small notch in the fireboard for the tip of your fire drill stick to rest in; that shallow notch is the place where you’ll center the contact to make hot ash.
Another good thing is with the notch. You will have a guarantee that one’s spindle doesn’t wobble everywhere on the fireboard. A side notch will also have to be included on the board; simply saying, the purpose behind it is that when one makes contact with the hot wood, the wooden strands need some oxygen and a spot to develop the starting fire. And if one lacks a notch, the hot wood fibers would have no place to develop. Therefore, it would take much longer to make hot ember, so make sure to have a small notch.
When everything is set up, the cycle is basic (not that it’s straightforward… but easy). The setup should be given enough friction (energy) to turn the contact point of the spindle and board into hot ash or ember.
Furthermore, as you probably already know, a hot ember is the Holy Grail while making a fire with sticks. This sounds straightforward, isn’t that so?
Indeed, it is, in general, but here’s the trick. When one rubs the hands together to twist the spindle, one likewise needs to push down to make pressure; one won’t have the option to make enough friction to turn the point of contact into a little hot ash if having no downward pressure.
Then again, huge amounts of friction are made simply by the blend of quick turning movements and simultaneous downward pressure.
Remember that to make an ember adequately hot to light tinder, it will take a gigantic amount of time spent on whirling and pressure over the long run. So you’ll have to whirl a lot!
And afterward, one must whirl, spin, twist and spin some more until the end of the fire drill rubbing against the fireboard produces a murmur of smoke… Now, when you see that whisper of smoke, you’re not done, yet you’re already on the way! You’ll have to ‘dig’ deeper and twirl with significantly more force.
Even if one needs to rest briefly or pause, one will lose the friction they worked so hard to make. Say no to breaks! You should keep on spinning if you desire to achieve the needed result… The key point is to spin until the fire drill’s top point gets appropriately hot to grow into a little hot ember. One can quit whirling when ash has already emerged and move the ember from the fireboard to the tinder package.
A decent ember will be done in several minutes, so no need to rush here, yet additionally, don’t just sit around. Instead, place the ember into the fire bundle. Then, one must slightly blow on the ember to provide it with some oxygen. It will stir up the ember and help it move the ember’s energy into the tinder material.
The tinder package will start to smoke slowly at first, then after blast afire, if you do everything in the right way.
Congrats! Now you know how to start a fire with sticks, employing the hand drill method.
As we already know, a picture is worth 1000 words. Following such logic, a decent video is worth one explanation a hundred times! So, below you can find a great video that dives into the details of the best methods to light a fire using the hand drill method.
Sounds simply, once again, but it’s not as simple as it sounds in practice. Frankly speaking, this is quite possibly the riskiest approach to start a fire with sticks. One will require a HUGE amount of determination to accomplish it.
Why? Now think about your hands: since not only will the touchpoint be influenced by the powers of friction, your hands as well, they will immediately get hot and sore. In case your hands are not used to such maltreatment, they will become rankled and bloody.
Well, that is the rub. Frequently the pain in your hands turns out to be too harsh that one is even not able to continue to work, not even reaching the step of a sparkling ember. It will be tough. You will probably even swear, maybe curse, surrendered in a stack of sweat-soaked, baffled agony… What a pity!
So, can a fire be inflamed with a fire drill setup using just your hands? Indeed, there is a possibility, yet except if your calloused hands are not used to such harsh work, you probably won’t succeed and finish the fire making process. In any case, you are not lost!
As for me, here you have two alternatives on how to heighten your probability of accomplishment of such a task:
- You can trade off whirling with someone who is camping with you, assuming you have someone… You need to move whirling duties rapidly so everything will be done appropriately. Because every stop that you make is, I’d say, disastrous. Even a brief one. You will just lose the hard-earned friction buildup; if you can change really fast, you will allow your hands and muscles a break. And over time might allow for a faster, more successful friction buildup.
- Make a basic tool and setup modification to take your sweaty, weak, fleshy hands out.
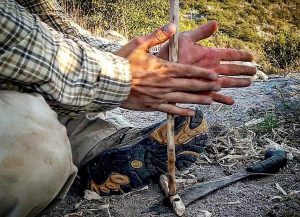
Making Fire with Sticks: Fire Bow
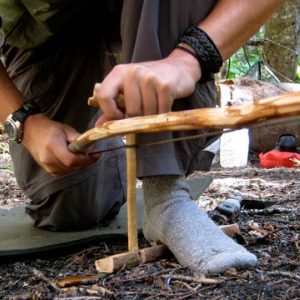
Another path on the best way to start a fire with sticks is utilizing a fire bow. These could be recognized from films of a specific time-frame where the characters make a bow-designed gadget from a branch and some twine. Then the fire bow is given a couple of smooth pulls, and just in some time, the fire leaps to life. I will re
peat it one more time. It’s not as simple as it looks: the directors of such films edit out the long hours of work, just plunging into the most amazing action – when the fire begins.
A fire bow is created from a durable branch, but one will need it to be somewhat wet for this situation. That is strange, yes. And while you are doing the frictions, this will keep it from snapping.
In short, you are searching for a C-shaped branch similar to a bow. Indeed, one can purchase a fire bow and practice its use at home. But here we are discussing minimalist camping and wilderness survival. Such things as blue light specials won’t save you!
One can try to create a fire bow using regular material (that is easy to find). This way, you will be able to perform such an action in wilderness survival. There are some steps to do after one has found a blow-molded stick.
Next, one will require some paracord or rope. Most string materials would serve just right: rope, shoestring, and so on. Personally, I wear a paracord bracelet on me consistently as paracord is a perfect material for this task.
After all, one may tear a long portion of durable material from one’s clothes on the off chance that one doesn’t have shoestrings or paracord. Not perfect, but well, you can make it work! Flexible vines or grapevines are another wilderness choice, so you can use them. The cordage you need is about 1.5 times the length of your fire bow, so make sure to have the length measurements right.
To each end of the fire bow, at the tip ends, you must attach the cordage.
Master Tip: A fire bow drill will serve far better if one selects a spindle that is bigger in circumference. This will help give the bow tackle more grip space, which will help smooth out the twisting process.
This way, the whirling does not imply using two hands at the same time, and you will be able to use just one hand on the fire drill. It is advantageous because the other hand could be used to hold a stabilizing bearing block. A stabilizing bearing block is a bit of wood (or shell) held and put on top of the top drill to keep it consistent as you whirl. If utilizing wood as this very block, then one will have to supplement a natural lubricant to the block.
A lubricant is needed to keep the block from making friction and working against your whirling efforts. Some examples of great lubricants are fresh leaves or a squashed worm. As we mentioned before, ensure you possess a tinder nest with flammable and available materials, prepared to get the coal you make.
Finally, now, the preparation to drill for fire is finished!
The fire drill cordage is circled around the stick so one may whirl it by moving the bow in a back and forth movement, just as you are doing sawing; the fire bow string whirls the fire drill, so its point rubs against the fireboard, giving the fire-creating friction by this back and forth action.
One must hold the fire drill always set up with your free hand that is put on top of the hand-hold. This way, you will keep the fire drill from moving everywhere on the surface of the fireboard.
The fire bow has some benefits of hand-twirling. Make excessive downward pressure and keep a similar twirling rate, and this is all because of the freehand pushing down on the spindle through the stabilizing block.
Then, when one of the hands is getting sore, you may switch hands, which should help to maintain a quick spinning rate and pressure without getting tired really quickly.
All of the other things are basically the same. So, once again, how to start a fire with sticks?
Rubbing -> Hot Amber -> Tinder Bundle -> Kindling -> Little Sticks –> Logs –> FIRE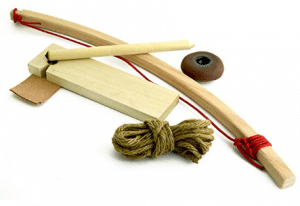
Well, now you can help your future self and choose a bow drill kit that’s specifically created for survival purposes.
A bow drill kit teaches how to start a fire with sticks in a much more easy and joyful way.
Below you can find a Youtube video that quickly explains this method:
Making Fire With Sticks: Fire Plow

A fire plow setup is another way to make a fire. This method utilizes a similar model of friction yet in a somewhat extraordinary manner – sliding.
With a plow, the essential friction effects from sliding back and forth, rather than the rotational movement; so to provide sliding, you make a trough in your fireboard.
The tip of your spindle should be placed in this very trough. Then one will have to push and pull the tip of the stick deeper into the fireboard at a forty-five-degree point. This way, the pressure pushes and slides the spindle along this hole. If you perform this really fastly, I’d say rapidly, and if you do this over and over, and strongly at the same time… then the friction build-up will produce a hot ember! All the other steps are basically the same.
Below you can find a video on employing Yucca (Friction Fire!) to create a fire plow:
Final Thoughts
Right now is an ideal opportunity to acknowledge everything on the topic of the best methods to light a fire with sticks and put it to some utilization, and the ideal approach to learn is to practice! I just did the first part of the mentioned. Presently it’s time for you to come up with the second part and do it.
One must practice how to make your own bow drill from natural materials. I’d love to find out about your success in the comment section beneath, so leave a comment if you want to. Have fun drilling and plowing!
Keep in mind: Plan, Modify, Succeed.
FAQ
How to Make a Fire with “Nothing”?
Well, in survival circumstances, many survival skills are needed, as well as the one that involves fire-making.
To start a fire, one will just have to:
- Prepare all of the materials perfectly.
- Start doing the friction process, using any of the three main methods in the process of fire-making: bow drill method, hand drill method, and fire plow method.
- Then, one must really quickly get the hot ember to your tinder package and blow smoothly, igniting it.
- Then, get the kindling and use the burning tinder package to burn it.
- You can then add pieces of wood (the type of wood doesn’t really matter)
- Make sure to keep adding large dry branches to create a long-lasting fire and continue the fire-making process.
What to consider before starting a fire?
First of all, consider you have all of the needed materials: a piece of wood, a fire stick, and anything you would like for kindling. The wooden materials must be dry!
Them consider the weather conditions, it is preferred not to be raining for evident reasons.
Reasons Why You Should Know How To Start A Fire With Fire Sticks?
Starting a fire is one of the necessary survival skills needed by all survivalists. Whether you are lost in the woods or just want to warm up your food, you WILL need a fire in any survival situation.
Fire making is also crucial as by starting a fire, one will always be warm, have warm food, can use the fire as a method of self-defense from wild animals. It can also be used for water-cleansing purposes when you have no water purifier. Instead, you can boil water to get it clean.
How to Make a Tinder Bundle?
Here is a quick guideline:
- Collect dry tinder materials (it can be literally anything, dandelion fluff, tinder fungus, or you can bring a fire starter stick if you are not really into minimalist camping)
- Roughly process the material by rolling it back and forth.
- Arrange the largest parts to form a ball
- Form a small mini-hole in the center of your ball to create the shape of a bird’s nest (in survival terms known as a tinder nest)
- Build your fire!
Additionally, you can use a fire pit (even an already existing one) to transfer the fire into it.
How to make a fire when it’s raining?
In a situation where it’s raining, one must work under a canvas, so all the pieces of wood and other materials stay dry. That’s the thing of the 1st importance, remember! Then, afterward, you can use either a hand drill method, a bow drill method, or a fire plow method and start a fire.