Making a survival cache in 2023 is spreading your bug out bag gear, weapons, ammunition, rope, water, and other items in different locations. We will show you how you can use PVS pipe tubes, how to deal with moisture, and make your cache waterproof (for example, use metal containers instead of plastic ones), and produce a vacuum, which can save your ammo and other bits. Read our article, create a map, take a screenshot, and the map itself with you on your next journey.
Introduction
Remember tales of buried treasures and other secrets kept secretly underground somewhere on islands to other remote locations? Guess what, those tales have not gone anywhere. Of course, these days, it is quite hard to picture pirates burying their gold and silver beneath palm trees or hiding chests full of treasures in caves. But people are still burying their stuff. Yes, they are.
Although people bury things for various reasons and lots of different kinds of stuff go underground, in this post, we will be covering the survivalist aspect of this matter.
Below, you will learn all you need to know about survival cache:
How to choose the proper location for it;
What instruments to choose to make a survival cache;
How and where to bury it;
What containers fit the best for a survival cache, etc.
But what is a survival cache and why you might need one? Well, a survival cache is just what it sounds like:
It is a secret hiding place with items you may need to survive.
Basically, it’s just like your home emergency storage in your basement, a garage, or a barn. The thing is that a survival cache may also be created outside your home and your private territory.
People choose to build survival caches to have an alternative option for emergency stashes should anything go, not the way it was planned. For instance, if a natural disaster or any kind of modern-day catastrophe gets you while you are not at home and cannot reach your emergency storage. Or maybe your home is invaded by looters, and there is no way you can make use of what you hid in your basement. In these and countless other cases, a survival сache is something you would be glad to have prepared.
You may use a survival cache as a bag restocking point on your bug out route. You will not have to carry too much stuff with you in the first place if you know there is a place with all that you need to get through the bug out hardships.
But to have yourself a secret survival cache, you have to know how to make it not only safe but reliable. You will have to make sure it stays secret, and no one will come across it by chance. Besides, you might want to rest assured you’re using the best storage container types for the task. Another thing is to know exactly what emergency items you should keep stored in your survival caches along your bug-out route.
Keeping in mind the geographic peculiarities of your region is also very important. It will have a great effect on what kind of cache you need to build. Whether you live in a swampy area, somewhere close to a desert, or a mountain region, you will have to consider those geographical aspects to make sure you will build a one hundred percent safe and reliable long-term cache.
Experienced survivalists know what a solid cache for any kind of survival situation is. But don’t worry. By the end of this article, you will also know all the need-to-know basics on building a reliable survival cache.
By the way, when you have finished this article, don’t forget to follow the link here to find out about the top 104 bug-out bag items you will need.
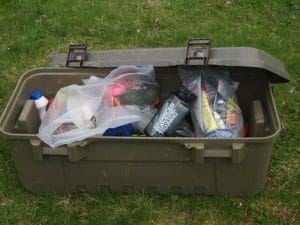
What a Typical Survival Cache Looks Like
So what does a typical survival cache looked like, and what does it have to contain?
As a matter of fact, these are not just some sort of questions a noobie would ask before getting started to assembling their first-ever emergency cache. Truth be told, even if you’re not new to survival cashing, you will still have to ask these questions to yourself to get an idea of what your next cache will look like and what emergency supplies it will contain.
This information will help you decide on what kind of storage containers you will need, how large these storage containers will be, and eventually how much space you will need for your new cache.
So, going back to the start, what does a typical emergency cache look like?
Let’s break down all the possible survival items into several categories:
Firestarters & illumination tools;
Medical supplies;
Weapons;
Communication devices;
Tools;
Entertainment & “adult” stuff;
Money.
Firestarters and illumination
Surviving is not an easy matter. So making it a lot less easy without fire and light is not an option. That is why survivalists know how important having firestarters and illumination tools in a cache is.
Let’s be honest, should the world end, you will not want to build a fire using sticks. It is both tasking and time-consuming. So when making a list of what you want to have in your survival cache, firestarters go on that list first.
Things like waterproof matches, rods & strikers, and lighters are your best friends in that matter.
As for light, you know that living in a post-disaster world with no powerplants to give us electricity will get dark pretty often. So you might want to get EDC flashlights, LED tactics flashlights, rechargeable batteries, portable chargers, and even candles on your emergency cache list. Another good idea is getting a gas lamp and some fuel to go with it. After all, you never know what kind of situation you may end up in.
Medical Supplies
Every bug-out bag, a get-home bag, or a solid emergency home storage havу these. Medical items are something you will be glad to have prepared. As long as having a complete paramedic set in your cache may seem slightly unreasonable, our recommendation is to have a first aid kit on your cache list.
This first aid kit will have some bandages and sterilizers, antibiotics, and painkillers. After all, medical survival gear does not take up too much space, but it is extremely important. So don’t neglect it and put medical supplies on your survival cache list.
Weapons
Surviving quite often means protecting. Being able to protect yourself and those around you is extremely important. And for that, you will need survival weapons. So having some sort of firearm or a melee type of weapon in your cache is a no-brainer.
But if you add firearms to your cache list, you must keep in mind that storing guns is not easy. You will have to think of how to protect your firearms from rust. Not to mention, you will have to bury them really deep and make sure no one will accidentally find your secret gun stash. There is always a certain risk in that matter. Believe us. You don’t want somebody to commit a crime with a gun that’s been registered on you. So when burying firearms in your secret cache, you will have to be one hundred percent sure that the cache IS secret and WILL stay secret until the time you will need it.
Communication Devices
That’s easy: staying in touch with the world is very important in a post-disaster survival. Our recommendation is to have a hand-crank radio in your cache. This is an amazing piece of survival gear! Not only does it let you receive emergency reports, but it also allows you to use it as a charger.
Another good idea is having a set of walkie-talkies on your cache list if you are planning to survive in a company.
A for a cell-phone… We don’t believe cell-phones will be of any use should the world experience a global-scale catastrophe.
Tools
It’s less likely that you may come across a hardware store on your way to your bug-out location. But hand tools are something you will definitely need. Things like a hatchet, a tactical shovel, a survival knife, a paracord, a hammer, or a saw are what may make a difference when the time comes.
But don’t have to put all eggs in one basket, stuffing your survival cache with all the hand tools and other utility items you can think of. Your best bet is to have several caches you can collect survival gear from as you’re heading to your secret hideout. But more on that later.
As for tools, our recommendation is to prepare the ones that can work as both a tool and a weapon. Something more specific you can store in your bug-out location, so they will not make your bug out bag heavier and heavier as you go collecting stuff from your caches along the way.
Entertainment & “adult” stuff
Maybe it’s not something obvious but keeping yourself entertained is something really important. After all, surviving is not only about building shelters, fighting off looters and hostile strangers, stitching wounds, and cooking on an open fire.
There will be times of rest and leisure. So you will have to think of something to entertain yourself and your company. A set of playing cards, a book on survival, paper and pencils, a boardgame or two are the perfect items to have in your cache container.
Also, you may add something for an adult audience if you know what we mean. Things like alcohol, cigarettes, cigars, chewing tobacco, marijuana, and pornography may not only be used for your own good time but may work as perfect bartering items.
In a post-SHTF world, many people will need such things as a glass of whiskey, a cup of strong coffee, or an issue of good-old porn. After all, we’re only humans with our needs and weaknesses.
Money
A pack of dollars is not something that important as food or a water filter, a survival knife, or a camp stove. But here’s a good idea: you may use those paper reminders of the world-gone-for-good as a kindling material.
So, these were the most popular and the most important supplies for survival caches. Of course, different situations and different types of caches make for a variety of combinations and options. But as far as a typical survival cache option goes, these items are what people should choose at all times.
Is One Survival Cache Enough?
If you want a short answer, then no, it’s not. Want to know why?
The thing is, the more survival caches you have, the better. Several survival caches make it easier to restock on supplies from time to time. Besides, the more caches you have, the smaller they get. Here’s the idea: what is the point of preparing one or two enormous caches when you can make several smaller ones? Why? Because that makes a lot more sense.
You can spread out several smaller survival caches all over around your bug out location or your permanent survival shelter. So when you start to run out of supplies, you will know that there are places you can go to restock.
Besides, let’s not forget how risky it is to put all eggs in one basket. Just imagine how devastating it is to find out that your only cache has been ravaged, leaving you with nothing at all. A sad and desperate situation to find yourself in, don’t you think so?
That is why our strong recommendation is not to put all your survival supplies into just one or two caches. Get a little more creative and make yourself several survival caches to make sure you will always have your plan B, plan C, plan D, and so on.
But making several caches will take more time and more money investment. Apart from that, you will also have to:
Look for more hiding options;
Put a lot of work into creating caches (packing supplies in containers, transporting them to the hiding spot, hiding them);
Try not to forget where you hid all your stuff. (Our recommendation for that is to draw yourself a map. Yeah, just like back in those pirate days.)
Our recommendation is to prepare a couple of medium-sized ones and several smaller-sized caches for the quantity and sizes of your caches. Spread them out to make sure that even if some of your stashes get ravaged, you won’t lose all your supplies.
Another pro for the multiple survival cache option is that such caches are a lot easier to prepare and hide.
But what should you use to hide your supplies it? What kind of containers fits the best for this job? More on that, in the next section.
The Best Survival Cache Container
When choosing containers for your survival caches, you will have to look at the environment you’re planning to use. One thing you can be sure of is that no wood is good for the job. Wooden chests and barrels (that easily rot, putting your survival supplies at risk) are something that should stay in pirate tales, whereas modern-day tasks require modern-day solutions.
Since moisture is what will threaten your supplies the most, you will have to make sure that it will not affect them. Therefore, use plastic and metal containers. Although metal is prone to rust over a long-term period of time, it is still a great container option since it keeps animals and insects out. Besides, if you’re living in a low-moisture location, metal containers will work just fine.
To safely hide survival supplies in moist soil, you will have to choose plastic containers with a waterproof seal on them. The downside is that a plastic survival cache container is an easier target for rodents who may gnaw their way into it. And while animals will not eat anything inside a container, they can scatter its contents all over the place, and a damaged container will let groundwater in.
So, when choosing a storage container type, mind your environment.
Survival Cache Container Ideas
Here are some of the most popular and the most practical ideas for storage containers you can choose to hide your survival cache in:
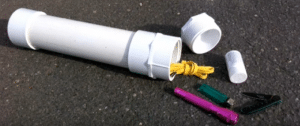
1) PVC pipe. A PVC cache is one of the most affordable survival cache options. PVC pipe containers come in a variety of sizes and are perfect for underground storage. They are plastic and won’t let water in. You will have to think of getting a strong sealant to go with your PVC pipe to make it perfectly waterproof. A PVC cache option is a perfect DIY solution you can be totally confident with.
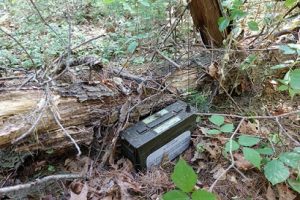
2) Ammo cans. This container option is what will work great for drier climates. If you’re living in a desert location, you will make great use of metal cans and boxes to bury your cache in. And ammo cans will work just fine.
3) Storage containers like those you can find in hardware stores are great due to their build qualities and weather resistance. They come in a variety of sizes, as well as in metal and plastic options. The only thing you will have to add to them is a high-quality sealant to keep water out.
4) Metal or plastic trash cans and barrels are also good. But what you would have to take care of using them is proper sealing. Remember, survival cache containers must be perfectly sealed to keep their contents safe from water. So if you find a way to tightly seal trash cans, they will work great as a container option. Just make sure you’re not using large cans and barrels – it is highly inconvenient. Your best bet is to go with medium- or small-sized options.
5) Another weather-resistant alternative is waterproof boxes. They do just what you would expect from cache containers – keep water out.
6) MonoVault container. To get an idea of what MonoVault cache containers are, watch the video below:
When arranging a cache, remember that underground water is your number one enemy in most cases (desert location aside). If water gets into your containers, it may compromise the safety of your survival supplies:
Water makes metal rust;
Water spoils organic products (should you choose to stash them in a cache);
Water ruins paper and wood materials (matches, maps, books, cards, etc.).
So our recommendation is to pay extra attention to your survival cache’s water resistance.
The best way to ensure this is to make several layers of protection:
You can use zip locks;
You can put smaller bags and boxes into bigger ones;
For a PVC cache, you can use smaller PVC tubes, putting them into larger ones.
When it comes down to water resistance, you just can’t do too much.
Another thing you will have to take care of is condensation inside a container. You see, there are items that hold moisture within themselves. And after some time, these products will release moisture, which then will result in condensation. Humidity will increase and may affect the container’s contents. So how do you prevent that from happening?
There are two steps for that:
1) Before putting such items into a container, dry them as much as you can;
2) Pack moisture-containing items into separate containers (a PVC tube, a plastic or metal bag, a box), so they would not affect other supplies.
Again, there is no way you will do too much when working on the water resistance.
Have you checked our 104 Item Bug Out Bag list yet? If not, do it right now, and then go back to reading this article to learn about the best location options to hide your survival cache in.
The Best Locations for a Survival Cache
What do you think is the best choice to hide your survival cache? Burying it? Well, without a doubt, it is a good way but not the only one and not the most effective.
The thing is, when you choose to bury your cache (which is, again, a good choice), you can’t be one hundred percent sure it will stay undiscovered. Who’s to tell that some animal won’t dig it out. Or some stranger may accidentally come across your stash.
What are other options?
Well, you may choose quite the opposite – hide your cache above the ground. For instance, you can use evergreen tress for that. Climb a tree high enough, and then attach your cache to the trunk. Use some heavy-duty duct tape and straps to makes sure your cache will solidly stay in place. A good idea would be to camouflage your secret stash so no one would notice it from the ground.
Arranging an emergency cache in your vehicle is another alternative. It will allow you to have all the necessary survival tools and equipment close at all times. In fact, this will turn your car into a bug-out-vehicle.
Again, we are not trying to make you change your mind about burying a survival cache. What we are trying to say is that there are really countless location options to hide a cache. You just have to use a broader approach to the matter and get a little creative about it.
If you are hiding a cache in your home, you can use an attic, and you can hide stuff under floorboards or in a hollow door, you can use a secret cavity in the wall, or even build a secret room in your home. You can also use old appliances to hide supplies in.
If you want to hide your caches outdoors, you can use your car, an old tire, an out-of-order well, a hollow stump in the woods, or evergreen trees, as we said earlier.
When it comes to secretly hide things no one should ever find, practically anything goes. You just have to make sure your stash is:
Properly and tightly sealed;
Well hidden in a remote location only you know;
Can be easily accessed when the time comes;
Unreachable by others and secured.
Don’t forget to read our article on 104 items you will need to make a proper bug-out bag. Follow the link to bookmark the post and then go back to finish this article. Below, you will learn how to and how not to bury your survival cache.
Burying Your Survival Cache
Well, now, let’s consider the situation when burying a cache is the only option. What you need then is to do it right. Because if you don’t bury your cache properly, there is a risk that your supplies will be compromised. So how do you bury your cache properly?
Digging Tools
First things first, what you need right off the bat is a solid and high-quality digging tool. If you’re planning to have your cache buried in a remote location, it is best to have a lighter shovel so it would not make it harder to get to the hiding spot. Our recommendation is to get yourself a quality tactical shovel.
These shovels are not only lightweight. Many models have some extra tools to go with them. You might as well make use of those tools, too.
For caches like a PVC tube cache, we would recommend getting a manual post hole digger. But if you’re not too fond of digging with your hands, you may consider buying or renting a powered post hole digger. Just keep in mind that it is heavier than a manual model and will surely cost you more to get it.
But if you are eager to go hardcore all the way, well, then you may want to go for a backhoe and dig as many hiding holes as you wish.
But again, this is not a common solution because most of us are going to dig manually. And if you do too then, you must consider the amount of time and effort the digging will take you. Our advice is to break down your caches into several smaller ones so you could dig more smaller-sized holes in different places, as we said in the previous section of this article.
Digging one enormous hiding hole will take too much time and will get you exhausted. Besides, doing so, you are putting yourself at risk of losing everything should your cache get ravaged or destroyed by a natural force (a flood, a fire, or an earthquake), leaving you empty-handed.
Water Resistance
The second thing you will have to consider when preparing to bury your cache is what kind of ground you will be digging: is it moist and soft soil or dry sand somewhere in a desert location?
Regular soil makes it for easier and faster digging. However, such soil contains moisture, which is very dangerous for your cache. If moisture gets in, your supplies will be compromised. So extra anti-moisture protection would be a great idea.
Sand is devoid of moisture (which is great), but this makes it harder to dig. But if you manage to dig through the ground that has next to no moisture in it, you can rest assured that your supplies are in a safer place.
However, there is a third case, which is burying a cache in a swampy location. Swamps, which comes with no surprise, are full of standing water. It is quite easy to dig swampy soils, but you will have to try your best to tightly seal your containers to ensure they are one hundred percent waterproof.
Our recommendation here is to use a rubber gasket for your container lids and a high-quality sealant. As an extra measure, be free to place containers upside down. In this case, should the waterproof seal fail, water will not get inside a container. Thanks to the container position and air pressure, there is a high possibility that your survival gear will stay secured in the matter of water damage.
It is unlikely that your cache would end up in the aforementioned situation, but still, our advice is to use both measures:
Ensuring extra water damage protection (zip locks, rubber gaskets, quality sealers);
Placing containers upside down.
We will also recommend using heavy-duty cement waterproof sealer with metal cache boxes as a means of water damage protection.
Choosing Locations
So when you’re all set with the above, it’s time to find the proper location for your cache. What is the best place for it?
Many people would say that nothing fits better than your own backyard. It’s close, and you know every inch of it. So what could stop you from choosing this piece of land to bury your survival items? Well, let’s see…
There are situations when your entire backyard may become subject to massive digging by your local utility company. And if that happens, your cache will get discovered.
A better decision would be to hide a cache under your home’s concrete slab. This will allow your cache to stay undiscovered. But here’s the thing: don’t bury your survival caches under your garage of basement slabs. Because if you do and there comes the time to get your supplies out, you will have to work really hard breaking through that concrete slab and making a lot of noise in the process. And you most likely don’t fancy drawing too much attention to yourself and your secret survival stash.
As an alternative, you may use a sidewalk slab. They make for relatively quick and easy access to the cache when the time comes. All you will need is the right tools like a crowbar. Another good thing about sidewalks is that they will let your cache stay unseen by metal detectors. You see, those seeking devices will be distracted by metal parts within the sidewalk slab’s concrete overshadowing your cache’s metal radiation.
Before we go on with what locations fit best for your survival cache, please follow the link to our 104 items bug-out bag guide. Bookmark the article and then come back to learn more about burying survival caches.
When choosing locations for your caches, try avoiding roads and highways. While burying a cache alongside a road may seem a good idea, it may prove otherwise in the long run. Some roads get expanded from time to time. So if a road you had previously buried your cache by undergoes reconstruction, there is a high possibility that your secret stash will get discovered.
So your best bet is to find the place that will most likely stay untouched and/or is hard to access. Try remote locations: woods, fields, mountain slopes, caves, and such. The harder it is to get to the hiding spot, the safer it is and the higher the possibility that it will not be found.
And one more thing:
Should you choose to bury a cache, make sure to bury it deeper.
Remembering the Cache Spot
As funny as it may sound (although it’s not), remembering the place where you had buried your cache and being able to find it is really important. In fact, what is the point of a secret emergency cache if you yourself are unable to reach it because you can’t seem to remember where it’s exactly at?
When burying or just hiding a cache, don’t rely on the locale’s peculiarities that may no longer be there when you come there next time. Picture this. You have a cache buried in the wilderness some ten or even more years ago. That’s a pretty long time, isn’t it? So what do you think are the chances that the place stays unchanged through all those years? And there’s even more. Human memory doesn’t seem to get better over time either.
With that being said, you probably might need something more reliable than just your memory and some local markers. We encourage you to consider these simple tips on how to ensure that your cache spot or spots will not get lost in time and memory.
Draw a Survival Cache Map
That’s the first thing to do right after you’ve found a secure location for your cache. But there’s a secret to your cache map. It should not be just a regular map of the territory from a local store with a path all the way down to the cache spot accurately drawn with a pencil.
Secure the Map
Your cache map should be drawn in a manner that only you and those concerned can read it. It sounds like a spy movie, but that’s what should be done if you’re really concerned about the hiding spot’s secrecy.
As an example, you could code your map. Here’s an idea:
Take two separate sheets of paper. Draw a scheme on each one. But let the scheme be incomplete. The trick is that the scheme must read-only when the two sheets are put over one another;
The next step is to hide those sheets separately;
Should anyone find one of the sheets, it will be impossible to grasp the whole idea of the map.
Using GPS
If the map method seems to you to be too complicated or even outdated, here’s a modern-day decision: using GPS tracking. Although, just as with the map, you will have to keep the GPS data secret.
You will also need a high-quality GPS tracker with a set of rechargeable batteries to go with it. Or you can get a portable charger like a hand-crank radio we already mentioned above. This device will not only let you charge other small portable devices like a smartphone or a GPS tracker but is also (and foremost) a great communication gadget that will let you stay up-to-date with the latest emergency radio reports.
We could not stress enough the importance of informing your family or your closest friends on where they can find your cache map or GPS data. Let’s face it, sometimes things go out of hand, and you, as sad as it is, may not just make it to the cache spot. For this grieve situation, it is extremely important to give those people who hold dear the opportunity to make use of your secret survival stash.
Conclusion
Well, now, hiding things is something we, humans, have been doing throughout our history since the caveman times. There is nothing more usual for us than make a secret stash with something valuable like gold or silver or something that will help us survive the hardships of, let’s say, the post-apocalyptic struggle for life.
So is it any wonder that preppers and survival enthusiasts all over the world make use of modern-day technologies and tools to invest in survival caches. And if you think you may become one of those, well, we sincerely hope that the information we’ve given above will serve you well and help you get started with the first survival cache of your own.
FAQ
What is a Survival Cache?
A survival cache is a secret hiding spot where you can store a variety of survival items like tools, weapons, water filters, first aid kits, etc. A survival cache can be located in various places. You can make a secret survival stash at home, in your garage, and in your car. Or you can look for a secure remote spot to hide your survival cache there. You can also make a survival cache network that will stretch all along your bug-out route.
How Do You Create a Cache?
There are several methods to create a survival cache. The most popular is burying your survival supplies. But you can also hide them in caves, tied them up to the tree trunks high above the ground so no one could accidentally come across them.
As for assembling a cache, you must first decide how large it is going to get and how many caches you are planning to make.
The best way is to settle for two or three middle-sized caches and several smaller ones. It is best not to make one large cache because, in that case, you will risk losing all your supplies should your cache get discovered, ravaged, or damaged.
As soon as youэму decided on the quantity and sizes of caches, then you will have to make a survival item list. The list should contain top-priority survival tools and devices you will need after an emergency event. For instance, a survival knife, packs of matches, a handgun, a mini water filter, a set of medical supplies, etc.
Your next step is to choose the proper containers for your cache. They should be metal or plastic. The most important thing is to ensure water damage protection because water is what can destroy all your supplies if it gets inside a box, a can, or a barrel.
When your cache is assembled, you will have to carry it to the hiding spot and bury it or hide it using any of the alternative methods.
What is a Food Cache?
A food cache is basically a subcategory of a survival cache. Whereas a survival cache serves as storage for all sorts of survival gear, a food cache only contains foods. Those foods are, of course, non-perishable like freeze-dried products and mylar bag ready-to-make meals. A food cache can be hidden at home, in a bug-out location, or it can be stored in some other place – the choice is up to a prepper.
Survival Retreat – How To Plan And Build Your Own
A survival retreat is a safe place where you escape if something terrible happens. It is obvious that after a disaster happens, it is most often unsafe to stay home. Planning a survival retreat takes knowledge, time, and money investment.
A typical survival retreat includes:
Food storage;
Survival tools and weapons storage;
An independent energy source;
An underground bunker (optional).
However, not everything must be kept directly in the survival retreat. Some emergency gear can be kept in survival stashes so a prepper would collect first-priority stuff while heading to the bug-out shelter.