All boys know how to make arrows. However, some of the arrows would not be effective in certain survival situations, such as those in 2023, when they need to be of a substantial weight and be present in sufficient volume to maximize chances of survival. In this article, you will learn which knots you must learn to tie, what tree is most appreciated by archers as the best for arrows, and more.
At first, glance, making arrows does not seem close to the crucial or life-saving survival skills we have discussed here before. To many people, making arrows may seem more of a whimsical Minecrafter’s hobby or a Game Of Thrones’ Fanclub joint activity.
Nonetheless, this is not only it — it is also a form and matter of self-reliance and additional preparedness of any self-respecting survivalist to hone this skill, in all seriousness.
If you master the Arrow-making skill – and pair it with the skill of Longbow making, you will be ready for any real-time adventure, no matter the epoch and location.
Today we will show you why this skill is absolutely needed not only for fancy reenactments but also for potential future emergencies regardless of what our world becomes after TEOTWAWKI.
Use our step-by-step guidelines on how to turn a stick and a piece of porcelain into a helpful hunting tool. It is reasonable to start with the basic arrow components.
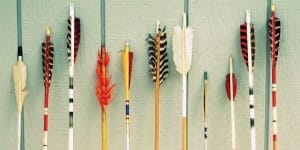
Primary Parts of Arrows
![]()
Several arrow types are depending on their fletchings, nock, or arrow points.
As the dictionary tells us, an arrow is a projectile with a stabilized fin that is launched from a bow and usually comprises a long straight, rigid shaft with stabilizers called fletching, and a heavy generally a rather acute head attached to the front end, and a tiny slot at the rear end called “a nock” which serves for string attachment.
To add a bit of history, traditional Native Americans used different sorts of the longbow, varying from the self bow type, a bow featuring a single slate of wood, to the backed wooden bow, which they strengthened with sinew and the compound bow that had some kind of horn or an antler-horn combination and sinew support.
It is essential to analyze what parts make an arrow before making your own one, so we should start here from tip to end.
Let’s now find out about the specificities of each part.
The Arrowhead
The little dreadful piercing tip of an arrow is called the “arrowhead.” Yes, it is tiny and not always sharp-edged, but all the damage is concentrated in it; arrowheads are generally made of metal or stone and maybe thin, broad, or medium-width. Obviously, the best ones are razor-sharp arrowheads so that the target is easy to pierce.
The Shaft
The next component of an arrow is the long thin part called the “arrow shaft.” This part serves in a way similar to the chassis of a car — it attaches the arrowhead and the fletchings, holding the overall construction together. Wooden shafts are the most common type of shaft materials.
The Fletching
The fletching is those tiny blades of classic feather or plastic responding for flight trajectory control.
Regardless of their small size, fletchings on the shaft’s back are essential to avoid erratic and uncontrollable arrow fly. It would be much more complicated and time-consuming to hit an objective without these fletchings.
The Nock
Finally, this tiny notch at the arrow’s base, the meeting point between the bowstring and the arrow. A decent and reliable nock is a need as it is accountable for the bowstring to fire the arrow, thus regulating the overall bow and arrow performance.
Without a notch at the arrow’s back end, the entire force of the bowstring release would not fully transfer to the arrow.
How To Make Your Own Arrows
Let’s divide the whole process of making arrows into creating its component parts consistently and assemble them when ready into your first DIY arrow.
It makes sense to start with the arrowheads, finish with the notch, and then sort out how to assemble the entire arrow.
How To Make Your Own Arrowheads
Making a good arrow starts with making an arrowhead and fitting it promptly, and you may be surprised at how many materials can serve as its basic source: find a small stone, a bit of porcelain, rebar, or glass and proceed to sharpen it. The most ancient and maybe the simplest arrowhead-shaping method is to break off a fragment of the rock by striking a rock with a harder and bigger stone. Yet this is not it.
Take the following steps to turn your randomly found raw material into a decent head of your arrow:
- Take a stone or a hammer, break some bits of Flint, Chert, Slate, Obsidian into nearly triangular-shaped pieces — about 2 inches long and 1 inch (or less) wide.
- Proceed to the “Flint Knapping” procedure, which means trimming and shaping the head of your arrow. To do so, you should hit against the edges with a screwdriver or a nail to get stronger edges —try to make them as jagged and ragged as you can.
- The following step is aptly called “Grinding” as it requires using sandpaper or a stone to grind and sharpen the edge so that it reminds of a razor. This may weaken the edges that will wear down with use a bit, but do not worry as the edges are not as crucial as the arrow’s point.
- After that, remove a pair of grooves or indents at the bottom of your arrowhead to attach to the shaft. This can be accomplished by using a bolt or screw to grind the stone to create perfect semi-circular indentations.
These instructions are very concise, so we kindly advise you to strengthen your knowledge by watching the video where the arrow-making PROs explain how to steadily make an arrowhead from a fragment of obsidian, rebar, or a primitive bit of porcelain.
How To Make Primitive Arrows
Obsidian has been considered precious source material for building a great number of stone-age tools for thousands and thousands of years.
Watch the video instruction on how to create an obsidian arrowhead for primitive archery hunting in just a few steps.
How To Make Arrowhead Out Of Rebar
And do you already know how to build a Forged Steel Bodkin Arrowhead from rebar?
Follow the guidelines to master blacksmithing a socketed bodkin arrowhead aimed at a bigger target and made of a fragment of simple steel rebar.
How To Make Arrows Out Of Toilet Porcelain
How to Make an Arrowhead Out of Toilet Porcelain: Shawn Woods step-to-step builds a primitive archery arrowhead out of a shard of an old toilet he stumbles upon when walking in a dumpsite.
For those of our readers who are still pondering that “such handmade arrowheads may not be half as good as costly store-bought broadheads,” we recommend watching the following test video.
Glass Arrowhead vs. Modern Broadhead – Gell Penetration Arrow Test
Want to learn which of the two — Glass Arrowhead or Modern Broadhead penetrates the target deeper? Watch the Ballistics Gel Acuteness Comparison before making a purchase.
It looks like the DIY arrowhead made of glass defeated the ready-made one in most of the parameters during the video testing. Certainly, to gain similar results, you should sharpen and improve your tools as well as your skills before you rush to practice your archery.
If you do not own as much spare time and energy as it requires, it is more plausible to simply buy some good broadheads in an online store and fasten them to the shafts of your arrows.
How To Make Your Own Arrow Shafts
Arrow shafts are generally made either of wood or of lightweight plastics. No matter the material you choose. Eventually, the handmade arrow shaft process is very similar.
Because these are the materials you can give shape using the machine, both are still firm enough to meet our goals. Every experienced archer knows that the basis of decent arrow shafts lies in balance and symmetry and is striving to make them as round as possible.
Selecting Your Arrow Shaft Material
Using proper wood, you aimed at getting a slab with very few flaws, blemishes, and a limited number of warps or knots.
Now find a raw piece of lumber and cut it up into several square pieces — the more, the better.
Cut them until they are as long as you plan them to be. Very soon, those will turn into your arrow’s wood shafts.
Want to see the process in more detail? We have a related video for you — it will guide you in choosing a suitable piece of wood for your arrow shaft and giving primary tips on making your DIY arrow shaft.
Arrow Shaft Making Jigs
Done with the previous step? Let’s then proceed to jigs. As you have your square cut shafts, you need to round them into dowels (arrow shafts). To achieve this, there are a few various methods described in the following videos. Do not worry, as the core process is almost the same for all.
First, you begin rotating your square shaft and run the square shafts through a saw blade, router, chisel, or sharpener. You create a rotating motion using a drill. It is this process of spinning and feeding that produces perfectly round arrow shafts.
Here are four videos explaining unique arrow shaft making jigs.
1- Simple Dowel Making Jig For The Table Saw
This video demonstrates a simple jig involving a drill and table saw to make dowels quickly and smoothly.
2 – Making Arrow Shafts With The Veritas Dowel Maker
There is another option, too — watch the video to learn more details.
3 – Old School Dowel Making Jig
Here is an easy way to create your own wood dowels for woodworking projects with this time-tested old school technology of dowel making.
4 – How To Make Your Own Arrow Shafts With A Shooting Board
Here is a different take on dowel making — have a look at the “Shooting Board” tool applied to making wooden arrow shafts, a method used for centuries that is still applicable today. This way, you do not even need to go to the hardware store and search for dowels.
Fine Tuning Your Arrow Shafts
Now take your drill to rotate the shaft fast in a small piece of sandpaper. This is a helpful tip to flatten and smooth the arrow shaft and fine-tune its symmetry.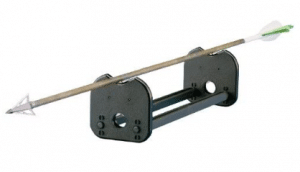
After that, you should try testing your arrow shaft with an arrow spinner.
An arrow spinner provides visual feedback on how symmetrical, balanced, and straight your arrow shaft looks.
We advise you to keep testing and sanding until it spins effortlessly and smoothly on your arrow spinner.
Otherwise, you may save your time and buy a fine arrow spinner or sweat a little and create your own one with the help of the following video.
How To Make Your Own Arrow Spinner
Here is a concise instruction on how to make a low-cost and easy DIY arrow spinner with the help of cabinet double roller catches that cost less than $1.00 per item and a bit of spare lumber.
How To Make Your Own Fletchings
It’s also a bit challenging to set your arrow’s fletchings promptly. They may play a decisive role by regulating the straightness of your arrow’s fly. Select a worthy fletching material before you attach the fletchings.
As you may already know, bird feathers have been used as fletchings by our distant ancestors. With the help of a sharp knife, cut the found feather down the middle rib and then fix it properly (it is advisable to place three feathers at the same distance from each other on your arrow’s shaft). However, today your choice is not limited by feathers only — among other materials available on the market, we would advise buying duct tape.
Make Duct Tape Fletchings
No matter which material you select, using a jig for fletching is the optimal method of applying your fletching in the desired location and controlling the orientation.
This is a helpful tool aimed at setting and fixing your fletching application right. Here’s how you may use a fletching jig.
Are you principled about making your arrow 100% DIY? For total DIY’ers, here we have a few options explaining how to create your own jig.
How To Create A Handmade Fletching Jig
To make a fletching jig only from scrap lumber and some ordinary household objects, you will need the following materials: glue, a piece of sandpaper, 3 1/2 inch by 5-inch piece of luan, several clothespins, 5- 1 inch drywall screws, two paint stirring sticks, and some more.
In plus, you will need some basic household tools such as a drill, ruler, square, saw, and clamp.
Adding The Nock To Arrows
The nock is not as plain as it may seem first — technically, it is a bit more than a slit at the arrow shaft’s end.
The following video will explain to you how to attach the nock at the end of the arrow shafts with the help of some simple hand tools.
Self-Cut Nocks In Wood Shaft Arrows
To start with, take an acute knife and cut either side of the nock so that it is flat. To get acquainted with the process of cutting self nocks in wood shaft arrows, watch the video instruction.
Some basic tips from the reviewer include adding several horn inserts for your self-nocked arrows. He advises doing so to bolster your nock and to avoid the ends’ splitting after intense and long-term use.
He outlines that the nock is the meeting point of your bowstring and arrow; therefore, it is the very point on the arrow shaft where the greatest force will be applied when transferring energy.
Horn Insets for Self Nocked Arrows
This video unveils the basic guidelines on how to strengthen self nocks on conventional wooden arrows with a strip of the horn.
The horn which the author of the video applies is the Black Buffalo horn available in pre-cut strips from a lot of archery brands and companies. In the Medieval Epoch, a usual cow horn was used instead of this one.
The video author also advises making a full nock out of a bit of ivory or antler instead of a self-nock with the bone insert.
As usual, you may not spend extra time and money and acquire nocks online and fix them at the end of the shaft as it is a simpler method. One thing you will need to do is just taper the shaft’s end using a tapering tool to let the nocks fit onto the shaft (obviously, choosing a tapering tool depends on whether it matches the shafts’ diameter).
Find out how to apply the metal Taper Tool.
How To Put It All Together To Create Arrows
Now you have made all the required steps to make your first arrows, and now you should set the overall construction by fitting the components altogether.
Still, at the end of the article, we have prepared for you some comprehensible educational videos that demonstrate the whole process of building arrows from the first to the last step.
Step 1 – How To Make Your Own Arrows
Step 2 – How To Make Your Own Arrows
Step 3 – How To Make Your Own Arrows
In Conclusion
You now have all the required basic information to get started building a DIY arrow. However, if this is absolutely new to you, we kindly advise you not to expect a masterpiece of an arrow at the first attempt and hone your skills in making training arrows in advance. If you want a state-of-the-art arrow in two shakes, it is more reasonable to get a ready-made one in a special store.
Since the best plan to get those skills is to take action, do not hesitate to start your practice as soon as possible, which means you should find a piece of raw wood, cut it into square sections, and treat it right by passing through a shaft jig, create an arrowhead, sharpen the edges, attach feathers — and here you are, the Lord of DIY arrows (or even The Prince of Archers, if you please)!
That’s how you make your own arrow in relatively few steps. Challenge accepted?
P.S. Besides, you can go on reading these great articles about survival in different situations:
FAQ
How To Make Arrowheads?
To make the head of your arrow look fine and firm, follow our concise guidelines:
- Take a stone or a hammer, break some bits of Flint, Chert, Slate, Obsidian into nearly triangular-shaped pieces — they should be 2 inches long and 1 inch or less wide.
- Use the “Flint Knapping,” which means trimming and shaping the head of your arrow. To do so, you hit against the edges with a screwdriver or a nail to get stronger edges — then try to make them as jagged and ragged as you can.
- Use “Grinding”: it requires applying sandpaper or a stone to grind and sharpen your arrow’s edge.
- After that, remove a pair of indents at the base of the head of your arrow to attach it to the shaft. This can be accomplished by using a bolt or screw to grind the stone to create perfect semi-circular indentations.
These are only the briefly presented steps, so we suggest you should watch at least one educational video as well.
How To Fletch An Arrow?
To put it shortly, firstly, you need to select the proper fletchings, then attach them to the shaft with a jig that aligns each of them in a precise place (we strongly advise to read the jig’s instructions in advance), adhere them onto the surface of the arrow, after that make sure it sticks well, and repeat once again.
How To Make Bows And Arrows The Traditional Way?
If you plan to build a traditional bow used years ago and made from raw materials that can be easily found in the wilderness, take the following steps:
- Get yourself a stick long and slim enough to build an (it could be an ordinary thin branch a bit thicker than a pen but make sure it is light, sturdy, and the straighter, the better). If you wish to make a longbow, seek a twig of a length similar to the distance from your shoulder to your wrist.
- Find a suitable shaped rock (ideally with a pointed end) — sharpen it against another rock, or use a sharpening stone. A fragment of an acute bone, porcelain, rebar, or thick glass may also go.
- Take string and feathers and glue them together. A pro-tip: a natural glue can be made of certain plants, flowers, and water. After that, glue your sharpened fragment of a rock to the end of the stick. Do not forget to cut a small notch at the back end of the twig. Let your arrow dry a bit and test it before using it as intended.
- To build a bow, seek a hard tree with a diameter of at least eight inches (this way, you will not have to carve it a lot). Cut and split the chosen branch, leave it to dry for a while, then debark your future bow with a special knife, and indicate the shape of the broadside of your bow.
- Develop and refine the shape of your bow, then taper the sides of the limbs with a knife.
- Use a chainsaw file to make string slots at a 45-degree angle on the outside of both tips, around 1/2 inch from each end. On the bottom limb, make an extra set of grooves for the bow stringer, a separate string used to bend the bow for stringing. Do not forget to sand and smooth the edges and your arrow’s front and back surfaces.
- Dry, seal, and paint your bow if needed. Take the parachute cord, cut it shorter, and make a tiny bend in the bow (for instance, 5 inches between the bow center and the string). To make an easy handle, use the hemp cord and wrap it around.
- Finally, make a bowstring using a specific bowstring material, hemp, linen, fibers, sinew, and so on.
How To Make A Homemade Fletching Jig?
In short, the homemade jig may be constructed from medium-density fibreboard, aluminum, and even bulldog spring clips. We have included a related VIDEO on how to build a jig that is both educational and exciting in the same-named chapter of our article. Otherwise, you may always find the essential instructions on the Internet.