Knowing how to act in a dangerous situation is as important as having a survival bag full of quality gear with you. History knows some survivalists, preppers, and homesteaders who could survive with bare essentials or simple camping basics, which, properly used, sustained them for many a day. One should never forget about the importance of survival food and water. But one should also get to know how to get them and store them properly.
We all know that cellars are used because of their possibility to keep the temperature more constant than any above-ground greenhouse.
And the greenhouses are built when you want to extend the growing season, as they help make the temperature warmer.
You probably do not know that a combination of a cellar and a greenhouse exists in our world, and it is called a walipini greenhouse/geothermal/pit.
Greenhouses’ History Time
A walipini can be translated from Aymara Indian as a place of warmth. This greenhouse was first constructed by the Benson Agriculture and Food Institute at the end of the 20th century in South America.
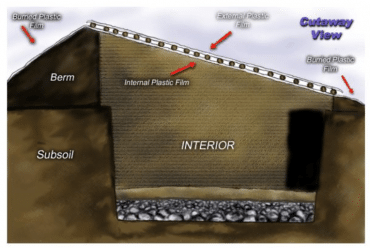
Created by Benson Institute, these walipini greenhouses now can allow you to grow plants all year round if you want to. You can create greenhouses by digging below the frost line, which is considered to be 3-5 feet below the ground, as, after that, the idea is that Earth can hold warm and stable temperatures there.
If we are talking about the States, then: in the northern part of the country, where cold climates are mostly present, this temperature is somewhere around 45-50 degrees, whilst in the southern part – it is 50-70. See how perfect this is for growing plants?
Moreover, just add coverage to the one side of your walipini greenhouse so that the sun would be able to note it, shine through, and heat your greenhouse even more!
These conditions of using underground thermal mass and attracting solar radiation, light, and heat six or eight feet underground let you make an almost perfect underground greenhouse that is not influenced by the weather changes constantly happening above the earth!
What can be gained from an underground greenhouse?
There are a few benefits that you can gain from this type of plant growth, and here they are:
- First, which is kind of obvious, is that the conditions of an underground greenhouse let you prolong your growing season or create an opportunity for you to grow whenever you want or have time to. A year-round growing season is also possible in these greenhouses!
- Second: when worrying about a possible survival situation or being in it, nobody would notice your greenhouse as they would have if it were above the ground. This way, you can protect your greenhouse and its harvest from any intruders. Moreover, we have seen online that it is even possible to create such a pit greenhouse that would keep all of your animals, hydroponic plants, and so on.
- Third, it is beneficial for people with unsuitable climates, such as dry ones: when little to no moisture can come to your plants, an underground greenhouse can come to the rescue, as it can keep the moisture in from the earth. Moreover, you can water your walipini earthen walls so that more moisture and warm air will come to your plants, which is basically the best conditions for them. And condensation can be included in your building plan.
- Fourth, it is very cheap to build a walipini greenhouse: just a few hundreds are enough. This number can even be reduced if you already have some materials needed lying in your house unused.
First Things First: Choosing the Location and the Structure of Your Greenhouse
Think about your local water table, soil type, and the size of the growing space for your pit greenhouse: the general rule is that the bigger it is, the more heat, light, and stable temperatures it has.
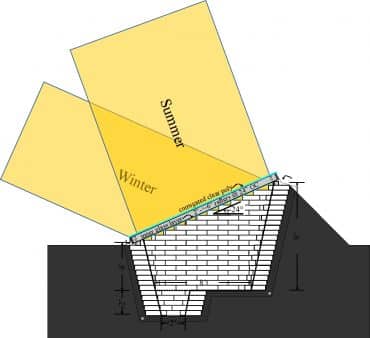
What you need to do is to make a hole in which three sides would be inside. The revealing one (the roof) covered with windows/plastic should always face the winter sun (which is a very important thing to remember, especially during the winter solstice, so that the heat from the sunlight would still come through), which is south for a northern hemisphere and north for the southern one.
Moreover, ninety-degree solar angles should be made between this revealing wall and the sun.
The best choice for you would be to find some hill, dig inside it, and make a revealing roof looking like a natural side of the hill, only with window/plastic sheeting for the solar energy and its light coming through.
However, we understand that this is not a realistic structure for most cases.
For example, a usual pit in the ground with the roof coverage would also work for an all-year-round greenhouse, but only if the sun would be directly in a 90 degree and the water level is taken into account.
Whatever you would choose, always remember to go beyond the frost line but above the water one. Also, make sure that insulation is made so that more heat would be able to come through.
A hint: at least four feet above the waterline are required.
When you find yourself in a situation when your waterline is measured in inches (which is a usual thing for coastal areas), it is not as bad as you might think. However, it means that more creativity should be put in and that most of your structure would be above the ground with a lot of dirt around it.
What this video on more details about DIY walipini greenhouse.
Necessary Materials
We understand that while the idea may sound really prospering, but the process of making an underground garden is a bit more intriguing and not as clear as you would have wanted it to be.
So, here is a very short list of materials:
- Wooden support beams (and nails or screws for them)
- Standard greenhouse plastic/windows
- Materials for insulation (heat attracting): it might be mud bricks, clay, straw bales, concrete piers, earthbags, stone, etc. This is, of course, if your soil is decent enough to hold the low-cost structures by itself.
- A door
- And a door frame for the roof covering.
It’s Time For Some Digging
Hints
- A crucial thing that MUST not forget when digging is to save your topsoil: as the sub-soil underground of your walipini is not suitable for growing fruits and vegetables, you will need your topsoil for placing it on the floor.
- Another hint that you might want to use is creating a drainage ditch for your underground construction. You might ask why, and we will tell you: this helps the water go around your walipini and not straight to its hole. You will want your sunken greenhouse to be equally watered, that is for sure.
- Also, do not forget that you will later start to make insulation for your sunken greenhouse. For this reason, insulation materials will take a foot or so, so do not forget about this fact when making your hole.
Digging options
Now that we have talked this through, let’s go into actions: remember to dig a hole of at least six feet underground, or even more if your water line allows that.
- When choosing a hillside structure, make sure that your greenhouse walls are vertical and the floor is horizontal.
- When making a regular pit structure, use your dug-out soil to create a berm for the north side of the hole: a decent amount of rammed earth at the back wall and a much lower amount at the front would help you make the needed angle.
After that, start to create your insulation: stones and bricks are general yet great choices for such a step. Use them on your east, west, and north walls. The floor can also be covered with them, but this is now up to you to decide.
For now, your hole is made, and the time for planting has come. There are two choices available for you: either directly use the soil or put some containers.
For the first choice, it would be great to put some gravel six or eight inches below your floor’s surface so that drainage, as well as heating, would be easier processes: both for you and your sunken greenhouse. Moreover, you may also need some compost.
Finishing Up with Your Greenhouse
Tick-tock, it is time to cover up your greenhouse. As we already have discussed what you can use for that, let us stop and talk more about an additional yet critical option: creating a roof vent.
Here you might be mind-blown: why do we do all of this stuff for keeping the place of warmth constantly heated if we now need a vent?
Surprise-surprise, your walipini temperature can even reach 100 degrees, no matter the weather conditions on the outer world, even in the northern hemisphere.
You can, of course, skip this part, but be prepared for the fact that you might need to leave the door of your greenhouse open for some time of each or so day, which is not a perfect decision for a survival situation, as some intruders (well, a trip wire will let you know in advance, of course) might visit you.
A hint: it is not necessary to use some expensive materials for the roof of your greenhouse: a simple double layer plastic stapled on a wood frame will do for the energy of the sun and its light to come through.
When finished, it is time to relax, as your sunken greenhouse is ready! Do not forget to clean the mess you left with a diy straw broom.
All you might want or need to do after that is check this fascinating video on the ways of our ancestors in growing food, even during the winter times.
Frequently Asked Questions (FAQ)
How deep should a Walipini be?
We would say that it depends on your reasons for using it, the water table and the length of winter in your region. Still, six feet underground is the point you should always achieve for using thermal mass heating. All that goes after is simply your choice and your region’s conditions, as they may differ in a northern or southern hemisphere.
When having a lesser depth, your walipini greenhouse and its walls would not keep its heat during the winter months.
Also, do not forget about the sun angles. North America – compared to any south region – has lower light conditions during the winter. That is why we would not recommend its residents make a year-long walipini.
How much does a Walipini cost?
No more than a few hundreds of bucks, or even less if you already have some building materials like cement sacks dusting in your garage.
All you would need is wooden support beams (and nails or screws for them), greenhouse plastic/windows, and materials for insulation of the walls (mud bricks, clay, straw bales, earthbags, stone, etc.). The last thing is a door and a door frame.
An understanding that this small and simple list would allow you to grow plants all year round will also help make your mind on this type of earth-sheltered greenhouse.
How to grow peas in your backyard?
This is a straightforward process, and most of the conditions are only related to the distance between peas and rows.
- The first thing is optional but beneficial – you might want to soak your seeds for a night before the planting process.
- Then you will need to sow your peas one inch deep or more if the soil is too dry.
- And do not forget to make a 2 inches distance between each seed and seven inches one between the rows.
This basically all that you need to do in the planting process. After that, you should only start watering when the seedlings appear and then do it weekly. Also, make sure that enough solar energy and light are coming to your peas, especially in the growing area of the north.
How to keep the sunken greenhouses from flooding?
There are two things that you need to take care of to avoid the flood. The first one is about the ground or the floor of your greenhouse: make sure to put some gravel a few inches underneath it so that it would help to absorb additional water from the soil.
The second one is about the roof of your earth-sheltered greenhouse: the ideal way to escape pourings is making a greenhouse on the hillside. If not, consider creating a drainage ditch on the surface so that all of the additional water flow would be equally distributed across your sunken greenhouses’ soil, not just in a center. Many growers actually use this method.
Moreover, think about the structural support for your greenhouse: if your soil is not strong enough to keep the initially created form structurally sound, some support might be needed, such as:
- Mud bricks,
- Clay,
- Straw bales,
- Stone, etc.